Monday, June 18, 2012

California Walnut Wine

Walnut Wine version one
 On June 7th my green walnuts arrived.  Fresh, cool, with a slight sheen of moisture, smelling like an entire walnut orchard in a box: acrid, pungent. If you've ever walked amid an orchard of walnut trees on a warm late spring day, you'll know what I mean.

On June 9th, I made walnut wine.  Three slightly different ways, but basically following this recipe on Lucy's blog.

I've been wanting to make walnut wine, or vin de noix as it's known in France, for about 4 years but the timing was never right.  Green walnuts are picked and shipped around the first week in June here in California, sometimes mid-June in the foothills if the weather is cool, and they cannot sit around waiting until one can "get to them".

Green walnuts do not wait.  They age and get wrinkles.  They get dark blemishes.  The green husk can turn mushy, the center changes from embryonic to, well, more like a nut.

You don't want any of these things to happen.

No, your green walnuts should be so young and nubile that you can stick a pin through them and these babies passed the pin test with flying colors.

Well, this year the harmonic convergence of time, ingredients and nuts came together and my first attempt at making walnut wine is now in process.  And after making up the first jar, I took some liberties, made a few tweaks.  You will too once you get the hang of this.  I thought of so many more possibilities after cutting that last walnut and placing it in its jar that I've already made notes for next year's bottling.


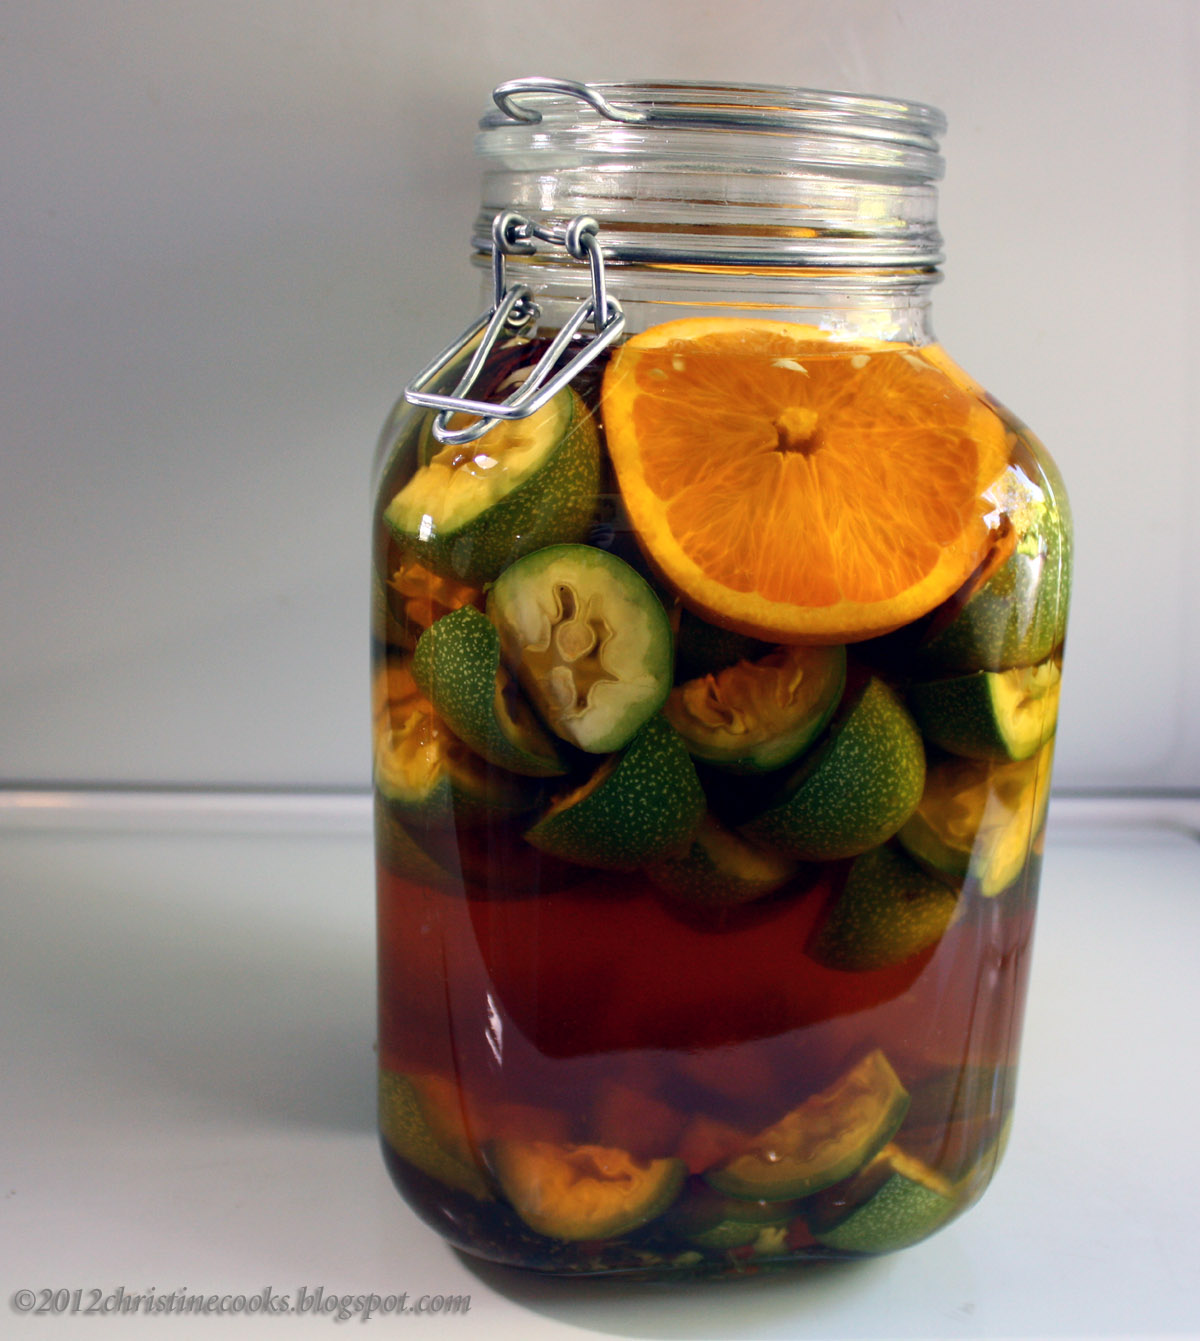
Walnut Wine, Jars #1 and 2

The two jars above hold 3 liters each so I doubled Lucy's ingredients list and more than doubled the amount of walnuts per jar because I had a total of 56 walnuts and wanted to use them all in this endeavor.


Jar #3 in the middle of this photo holds 2 liters


For the 3-liter jars I made the following adjustments (follow the basic recipe here):


Jar #1:  20 quartered green walnuts,  1 liter vodka, 1 bottle white Bordeaux wine to top off the jar,  3 cloves, 2 star anise and 4 Sichuan peppercorns, 3 thick slices Cara Cara orange.


Jar #2:  Same amount of nuts, California Rare White, which is a blend of Sauvignon blanc, Chardonnay, Marsanne and Semillion, 5 cloves, 1 star anise, 4 Sichuan peppercorns, 1/2 cup maple syrup plus 1/3 cup vanilla sugar (home made), 4 orange slices, and only 1/3 of a vanilla bean.


Jar #3 (the 2-liter one):  15 nuts (yeah, it should be 16 but one had some damage so I tossed it), 700 ml vodka, 3/4 cup coconut palm sugar, 1 star anise, 4 clove, 1/2 of a vanilla bean, 2 slices of orange and topped it off with the white Bordeaux.


These lovelies are sitting in our cool wine vault.  I visit them often, cooing sweet nothings to their impervious glass walls.


I'll be bottling them around the 9th of August.  Check back for an update.


This year's walnuts came from Haag Farms in Esparto, California, a few miles up the road from where Mr CC and I lived almost 20 years ago.

And for comparison, another source I hope to try next year is Clary Ridge Ranch, where the green walnut harvest is shipped about 2 weeks later than valley nuts.


Copyright © 2005-2012, Christine Cooks. All rights reserved

Monday, June 4, 2012

Apple-Cinnamon Bread Pudding with Fresh Apples


Once in a great while I just have to make something sweetly ooey-gooey delicious (and, um, fattening), not just to satisfy a personal craving, but also to assure Mr CC that I've still got the chops.  Plus, lucky him, he gets to eat (most of) the results.

So, this here before you is a moist, creamy, crusty, raisin-walnut-apple-y, boozey bread pudding that I defy even the staunchest dieter to resist:  It's got sugar but not too much; it's got cream but just enough to make your belly grin; it's got toasted, challah-like cinnamon-apple bread (mine was locally produced. Plain challah would be fine as would any sturdy bread but you may have to up the sweetness a bit); it's got fresh, chunked up apples, and it's got a tipple of bourbon - just because.

I won't lie; one of my favorite celebrity chefs (and I don't have many), Michael Symon, made a version of this and I've adapted that recipe for myself.  And you.

Plan ahead for this one; there is some refrigeration time before baking.


Apple-Cinnamon Bread Pudding with Fresh Apples
Print recipe
Adapted from Michael Symon's Sunday Suppers
Ingredients:
1 loaf cinnamon-apple bread - cut into 1-inch cubes, toasted, makes 6-8 cups
4 Granny Smith apples, peeled, cored and cut into 1-inch chunks
1 tablespoon fresh lemon juice
unsalted butter for the dish
6 large eggs or 12 ounces (my chickens lay very large eggs so I measure by volume)
2 cups whole milk
1 cup heavy cream (plus more for serving - optional)
1/3 cup Splenda/Sugar Blend or 2/3 cup sugar
1 tablespoon great bourbon such as Maker's Mark
1 teaspoon good vanilla
1/2 teaspoon fine kosher salt
1/4 teaspoon freshly ground nutmeg
1/4 teaspoon cinnamon (preferably organic Saigon)

Preparation:
Heat oven to 350 degrees F.  Place the bread cubes in a single layer on several baking sheets. Bake in the oven until golden brown, shaking the pan several times so it won't burn.  You may have to switch the pans around to avoid oven hot spots.  Remove croutons from oven and allow to cool completely.
Butter an eight to ten-cup dish, rectangular or round, and set aside.
Peel, core and dice the apples, placing them in a large bowl. As you work, sprinkle the diced apples with lemon juice as they layer up in the bowl; this will keep them from getting discolored.
When the croutons are cool, place them in the baking dish topped with the diced apples.  Toss briefly to lightly mix.
Whisk together the eggs, milk, cream, sugar, vanilla, salt, cinnamon and nutmeg until well blended.  Whisk in the bourbon.
Pour the egg mixture over the crouton-apple mixture, pushing the croutons into the custard as much as possible (they will pop up of their own accord anyway, so what you want to do is get them moistened).  Cover with plastic wrap and refrigerate for several hours, occasionally pushing the croutons into the custard.

To bake:
Heat the oven to 350 degrees F.
Place the pudding-filled baking dish inside of a larger roasting pan and fill the roasting pan with hot water so it comes halfway up the sides of the baking dish.
Place the whole thing into the oven and bake for 45 minutes to 1 hour or until the top is golden brown and a wooden pick comes out clean when inserted into the center of the pudding.
Allow the pudding to cool to just warm or room temperature.

Serving suggestions:
Spoon several tablespoons of heavy cream onto a dessert plate and top with a scoop of warm bread pudding.  Drizzle a bit more cream over the pudding and serve immediately.
- Or -
While the pudding is baking, whip some heavy cream, adding a bit of sugar and a few teaspoons of bourbon, until stiff peaks form.  Keep chilled. Top pudding with a dollop of whipped cream and a dusting of cinnamon just before serving.

To refrigerate leftovers, don't cover with plastic wrap which will cause condensation to form which will water the top of the pudding. Instead loosely drape with parchment paper.

Bon appétit.


Copyright © 2005-2012, Christine Cooks. All rights reserved

Sunday, May 13, 2012

Kitchen Gadgets I Could Live Without But Would Prefer Not To: 1970s Nutmeg Grater


This vintage nutmeg grater has graced my kitchen and grated my nutmegs for 37 years (I counted backwards and, yes, that's about right).  I bought it at a now-closed (and more's the pity) gift store in downtown Davis, my hometown, called Discoveries, a place with small beginnings in 1960 that grew to occupy three levels - basement, main and 2nd floor - next to what used to be the Cinema II indie movie theater.  My older boys will remember fondly the basement level, filled with quality childrens' toys including their beloved Legos.

Discoveries was the first gift store of its kind in Davis to feature greeting cards that were not Hallmark (a rarity in those days), small kitchen appliances, table top ware (I bought my first cloth napkins there - probably in shades of avocado and gold), small unique gifts, the sweetest gift wrap around - their signature emblem sticker, a gold sunburst, affixed a tiny bouquet of dried straw flowers to each beautifully wrapped package - and the most complete section of kitchen gadgets I've seen anywhere.  Bar none.  One could say, and I do, that my kitchen began in Discoveries.

Dorothy Briggs, one of the original three owners who went on to be the sole owner/manager until 1993, was a pretty scary lady.  As a newly married 23 year old, I remember when I wanted to return a duplicated wedding gift and she glowered at me, sending me away with a curt admonition to "come back when it's not so busy" and just what was I thinking, anyway?

So, what's so special about this nutmeg grater?  It's made of stainless steel, has never worn out (I stopped using pre-ground nutmeg when I bought this, freshly grated nutmeg being far superior), the non-grated portion of a nutmeg nut may be stored in the lidded compartment, and it was fabricated in West Germany.  Yes, West Germany.  Which, last time I looked, does not exist anymore.

Kinda like Discoveries.

You can buy a stainless steel nutmeg grater, made in China, in my Amazon Store, but if you truly want one like I have you'll have to go antique hunting.

Copyright © 2005-2012, Christine Cooks. All rights reserved

Friday, May 11, 2012

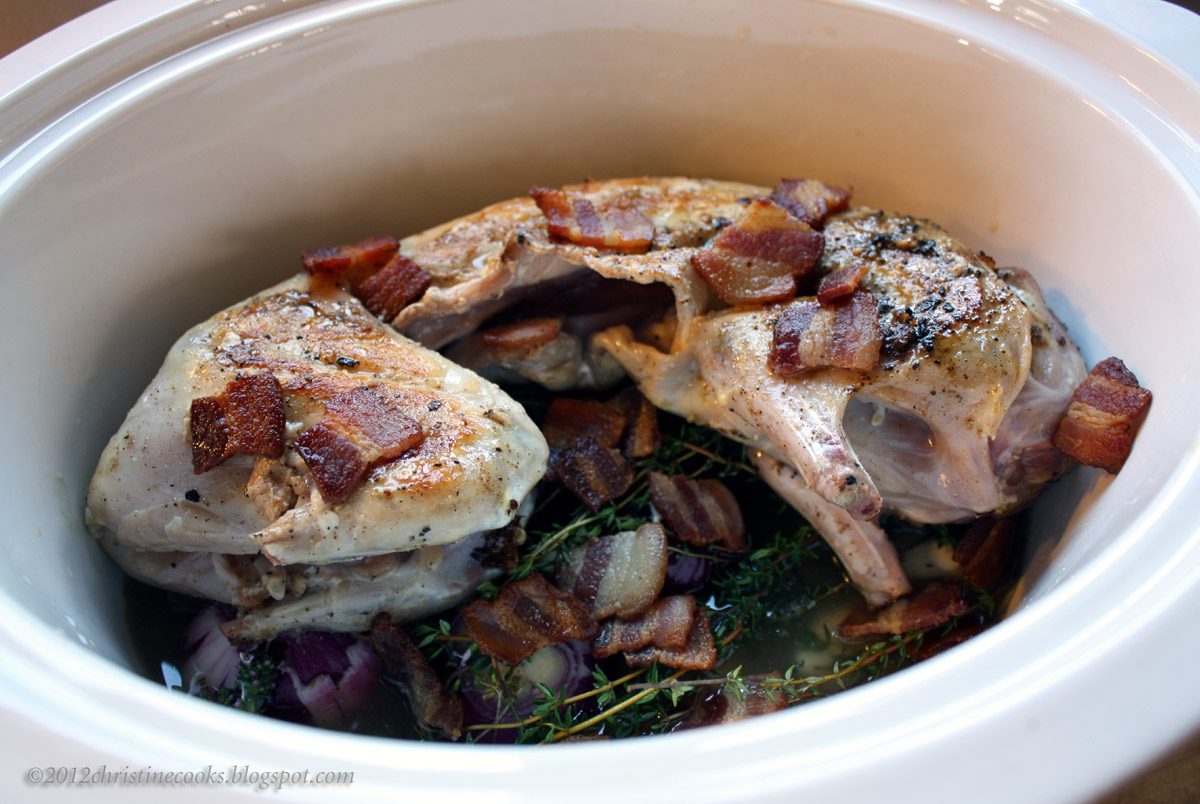
Slow Cooker Braised Rabbit with Garlic, Cippolini Onions & Thyme


I am not feeling well.  Haven't been for almost a month.  That nasty cold/flu thingy knocked me flat.  A few days ago I began to recover; almost felt like myself again.  Went back to work, saw a few plays in Ashland.  Felt not perfectly fine, but at least better.  Then the headaches began, temperature spiked, felt hot, clammy, chilled all in the same minute.  Went to the doc and whaddaya know?  I have a sinus infection.  Arrrg.  Back to laying around, trying to rest, trying to get better.
Soooo boring.

Why am I sharing this?  Two reasons:  1) If you get, or have, that nasty cold/flu thingy?, take good care of yourself. Get plenty of rest and do not jump up and do the samba just because you think you are better. It's a nasty, nasty virus that will knock you down again if you get too cocky;  2) The dish you see above is directly related to how much effort I was willing to put into dinner.  For all that, I was able to use ingredients I already had in the house and garden, it required very little prep time, and turned out to have the taste and comfort level my weary self was craving.  The look of the finished dish isn't going to win any awards, I know that, but comfort level?  A winner for sure.


So here's what you do (and in the Cook's Notes I'll tell you what I would do differently next time):
Pull a rabbit out of your hat freezer and defrost it overnight in the fridge.  If you don't have a rabbit, use a chicken.
Peel six red cippolini onions and twelve or more cloves of garlic.  Leave them whole.  Get out some whole peppercorns (Tellicherry are my favorite), some flakey sea salt, a couple of bay leaves (fresh if you can get them; I happen to have a bay tree growing just outside my door) and a handful of fresh thyme sprigs.  If you have some bacon hanging around, already cut into large-ish dice and already cooked (because Mr CC has been cooking for me and he loves bacon), use about a half cup of that.  (If you are feeling well enough to go to the store, buy some good smokey bacon, cut it into large-ish dice - about 3/4-inch square -  and cook it.)
You will need some dry white wine (I used a Sauvignon Blanc) and some homemade or low-sodium store-bought chicken stock.
And that's it.


In the slow cooker, lay down the whole onions, garlic cloves and peppercorns first then place 1/2 of the thyme sprigs over them, then 1/2 of the bacon pieces.


Sprinkle the rabbit all over with sea salt and fresh-ground black pepper to your liking.
Quickly sear the rabbit in a hot skillet, in a slick of bacon fat if you have it, if not, olive oil with a small amount of butter is fine, until lightly browned all over, then place the rabbit over the aromatics in the slow cooker.  Using 1/2 of the white wine, deglaze the skillet, scraping loose the browned bits from the bottom and pour that over the rabbit.
Sprinkle the remainder of the bacon pieces and the remainder of the thyme sprigs on top of the rabbit.
Gently pour in the rest of the white wine and the chicken stock.
Set the slow cooker to high for the first 4 hours, then low for the next 4-6 hours, depending on how long it takes your slow cooker to render the rabbit fall-off-the-bone-tender.
Go back to bed and wait rest.
After 4 hours the scent wafting through the kitchen will drive you crazy, but you must wait until tenderness is achieved.
Sleep a little, it'll help.

Slow Cooker Braised Rabbit with Garlic, Cippolini Onions and Thyme
Christine's Original Recipe
Ingredients:
1 whole rabbit, skinned (a chicken may be substituted)
12 cloves garlic, peeled and left whole
6 cippolini onions (red or yellow), peeled and left whole
10-12 sprigs fresh thyme
2 bays leaves, fresh if you have them, dry are ok
1/2 cup cooked bacon pieces in approx. 3/4-inch dice
5-6 whole peppercorns
sea salt and freshly-ground black pepper to taste
1 and 1/2 cups dry white wine, divided
1 cup low-sodium stock (preferrably home made)
Preparation:
Place the onions, garlic and peppercorns in the bottom of a slow cooker. Sprinkle with 1/2 of the bacon and 1/2 of the thyme sprigs.
Sear the rabbit in a skillet over high heat in a small amount of fat (bacon fat, duck fat, olive oil, butter - your choice) until golden brown.  Adjust heat so rabbit doesn't burn.
Place the seared rabbit over the aromatics in the slow cooker.
Pour 1/2 of the white wine into the hot skillet and scrape up the browned bits from the bottom, allowing the wine to reduce by half.  Pour this over the rabbit.
Sprinkle the remaining bacon pieces over the rabbit followed by the remaining sprigs of thyme.
Pour the chicken stock and remainder of the white wine into the slow cooker, put the lid on and set the cooker to High for the first 4 hours, then to Low for 4-6 hours thereafter.
If necessary, it's okay to turn the rabbit over once or twice during cooking.
When the rabbit is tender, turn the slow cooker off or set it on Hold.  Using tongs, remove all the thyme stems.
Transfer the rabbit to a warmed plate and divide into individual portions.  Spoons the onions, garlic and juices over and around the rabbit and bring it to the table.

Cook's Notes:
Had I been feeling better, I'd have cut the rabbit into serving pieces before searing and cooking. I think it would be much more manageable that way.  That said, this wasn't all that unmanageable.
Watch out for bones:  this isn't chicken (or maybe you used a chicken?), rabbit bones are tiny. 


Copyright © 2005-2012, Christine Cooks. All rights reserved

Thursday, May 10, 2012

Coming Out From Under a Rock . . .


. . . at least I hope so.

It has been awhile since I've shown up here.  And to be honest, what posts I have written in the past seven months did not have my heart in them.  I didn't know what to say.  What to write.  Simply carrying on as though nothing had happened is not my style.  When changes occur, when life throws punches, I want to share. I am an explainer.  But you know, some things are too private.
So I was quiet.

When I read the recent post of a blogger for whom I have tremendous respect, there it was:  A way with words to re-enter the world of recipes, stories and photos without spilling my guts.  In other words, come out from under my rock.  Because make no mistake, I've been in hiding.


So now, with a bit of trepidation, I will begin again, trying out my voice, here on these pages.


This minute, there is a whole rabbit braising away in my slow-cooker.  I didn't mean to be a copycat, in fact had forgotten all about the recipe when I pulled the rabbit out of the freezer, and I certainly chose my own ingredients for my own reasons but, all the same, something was resonating in my culinary sub-conscious so I've got to credit and thank Lucy for my inspiration - on so very many levels - for the recipe to follow . . .


Copyright © 2005-2012, Christine Cooks. All rights reserved

Monday, March 19, 2012

Jade Chocolates: My New BFF

 Tart dried green mangoes, spicy lime-chili rub, flecks of gray sea salt, all atop dark, bitter-sweet, perfectly bite-sized chocolate tiles. Oh, my.

One bite and I was smitten.

I bought a box, shared them with friends, then had to leave San Francisco the next morning to drive home.  No time to buy more.

A week went by. Cravings set in.  I prowled their web site to no avail. (Well, she had told me they wouldn't be posted for a few weeks yet, now hadn't she?)


 And then...  And then..., there they were. I couldn't submit the order quickly enough; my fingers tumbling all over the keyboard in my haste.

Within a few days they arrived on our doorstep and Mr CC brought them in; wrapped in a nondescript brown shipping box, he had no idea what he was holding (heh, heh).

Yes, I share them. But sparingly, people, sparingly.

Jade Chocolates is an award-winning, San Francisco based business run by Mindy Fong, owner and chocolatier, and one very nice person. Do read her bio and check out the rest of the chocolates she creates by blending superior chocolate with teas and spices from Asia and the Pacific Islands.


If you wanted to, and I whole-heartedly encourage you to do so, you can order these lovely mango delights at Jade Chocolates right now and take advantage of their special price.  I think they will make your tongue very, very happy.


Full disclosure: I did not receive a request to review this product, nor have I received any remuneration for doing so. Sometimes I just want to give a shout out.


Copyright © 2005-2012, Christine Cooks. All rights reserved

Sunday, February 12, 2012

Truffle Tremor - Lots of It!


I've never bought a 3-pound wheel of Truffle Tremor before.

At it's usual price per pound, the cost of a wheel hovers around $75; more if purchased outside of Humboldt County.

The other day, however, our beloved, award-winning cheese company, Cypress Grove Chevre, which, by the way, is a mere 12 miles from my kitchen (oh how I love saying that), had a special sale of their  Truffle Tremor and I snatched up a wheel of it lickity-split.


 Do you see the price per pound, people?


What you see here on my kitchen counter is a well-aged wheel of Tremor; to my palate, the most perfect state this cheese can achieve.  The bloom is velvety and white, the ooey-gooey layer just under the rind (called the proteolysis - my favorite part) is thick and runny, the texture of the cheese is dense and crumbly. The taste?  You can read a review I wrote some years ago here.

So, why was it marked down?  I have no idea.

Maybe the good folks at Cypress Grove just wanted to give us an early Valentine's gift.

Well Cypress Grove, I love you too!


Copyright © 2005-2012, Christine Cooks. All rights reserved