Showing posts with label comfort food. Show all posts

Friday, May 11, 2012

Slow Cooker Braised Rabbit with Garlic, Cippolini Onions & Thyme


I am not feeling well.  Haven't been for almost a month.  That nasty cold/flu thingy knocked me flat.  A few days ago I began to recover; almost felt like myself again.  Went back to work, saw a few plays in Ashland.  Felt not perfectly fine, but at least better.  Then the headaches began, temperature spiked, felt hot, clammy, chilled all in the same minute.  Went to the doc and whaddaya know?  I have a sinus infection.  Arrrg.  Back to laying around, trying to rest, trying to get better.
Soooo boring.

Why am I sharing this?  Two reasons:  1) If you get, or have, that nasty cold/flu thingy?, take good care of yourself. Get plenty of rest and do not jump up and do the samba just because you think you are better. It's a nasty, nasty virus that will knock you down again if you get too cocky;  2) The dish you see above is directly related to how much effort I was willing to put into dinner.  For all that, I was able to use ingredients I already had in the house and garden, it required very little prep time, and turned out to have the taste and comfort level my weary self was craving.  The look of the finished dish isn't going to win any awards, I know that, but comfort level?  A winner for sure.


So here's what you do (and in the Cook's Notes I'll tell you what I would do differently next time):
Pull a rabbit out of your hat freezer and defrost it overnight in the fridge.  If you don't have a rabbit, use a chicken.
Peel six red cippolini onions and twelve or more cloves of garlic.  Leave them whole.  Get out some whole peppercorns (Tellicherry are my favorite), some flakey sea salt, a couple of bay leaves (fresh if you can get them; I happen to have a bay tree growing just outside my door) and a handful of fresh thyme sprigs.  If you have some bacon hanging around, already cut into large-ish dice and already cooked (because Mr CC has been cooking for me and he loves bacon), use about a half cup of that.  (If you are feeling well enough to go to the store, buy some good smokey bacon, cut it into large-ish dice - about 3/4-inch square -  and cook it.)
You will need some dry white wine (I used a Sauvignon Blanc) and some homemade or low-sodium store-bought chicken stock.
And that's it.


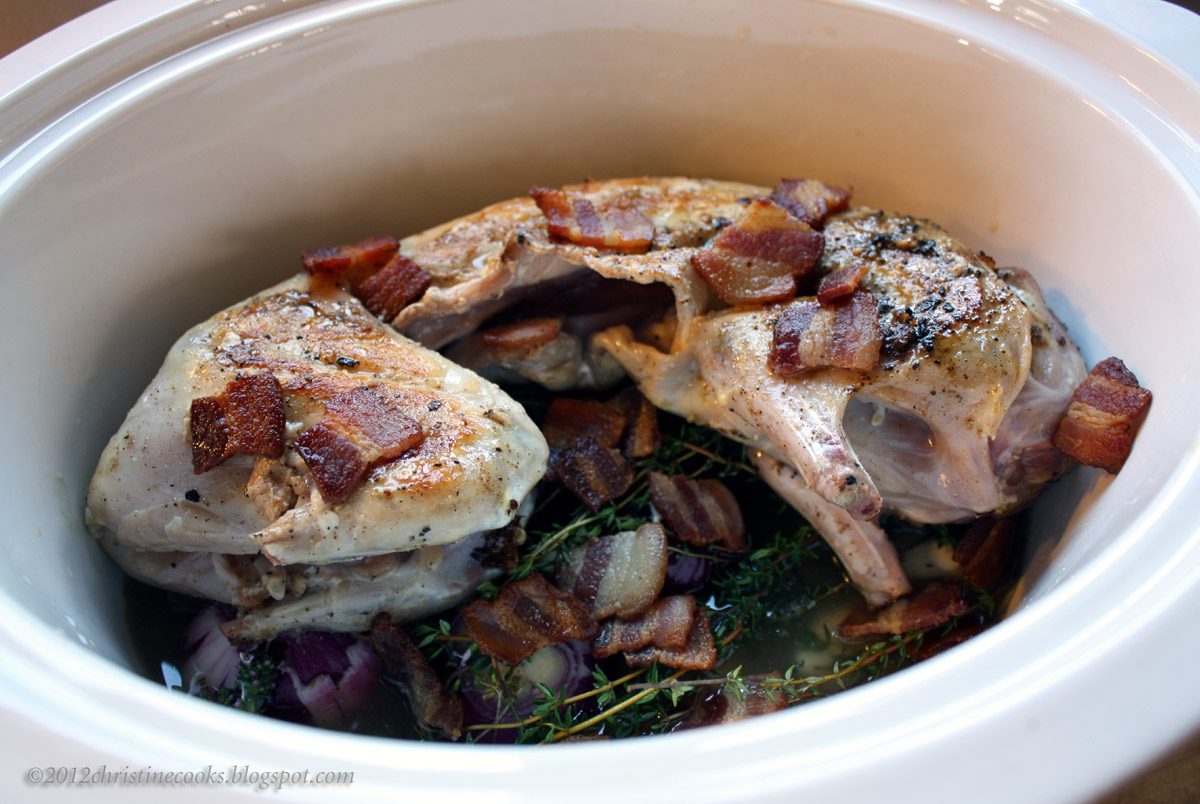
                             

In the slow cooker, lay down the whole onions, garlic cloves and peppercorns first then place 1/2 of the thyme sprigs over them, then 1/2 of the bacon pieces.


Sprinkle the rabbit all over with sea salt and fresh-ground black pepper to your liking.
Quickly sear the rabbit in a hot skillet, in a slick of bacon fat if you have it, if not, olive oil with a small amount of butter is fine, until lightly browned all over, then place the rabbit over the aromatics in the slow cooker.  Using 1/2 of the white wine, deglaze the skillet, scraping loose the browned bits from the bottom and pour that over the rabbit.
Sprinkle the remainder of the bacon pieces and the remainder of the thyme sprigs on top of the rabbit.
Gently pour in the rest of the white wine and the chicken stock.
Set the slow cooker to high for the first 4 hours, then low for the next 4-6 hours, depending on how long it takes your slow cooker to render the rabbit fall-off-the-bone-tender.
Go back to bed and wait rest.
After 4 hours the scent wafting through the kitchen will drive you crazy, but you must wait until tenderness is achieved.
Sleep a little, it'll help.

Slow Cooker Braised Rabbit with Garlic, Cippolini Onions and Thyme
Christine's Original Recipe
Ingredients:
1 whole rabbit, skinned (a chicken may be substituted)
12 cloves garlic, peeled and left whole
6 cippolini onions (red or yellow), peeled and left whole
10-12 sprigs fresh thyme
2 bays leaves, fresh if you have them, dry are ok
1/2 cup cooked bacon pieces in approx. 3/4-inch dice
5-6 whole peppercorns
sea salt and freshly-ground black pepper to taste
1 and 1/2 cups dry white wine, divided
1 cup low-sodium stock (preferrably home made)
Preparation:
Place the onions, garlic and peppercorns in the bottom of a slow cooker. Sprinkle with 1/2 of the bacon and 1/2 of the thyme sprigs.
Sear the rabbit in a skillet over high heat in a small amount of fat (bacon fat, duck fat, olive oil, butter - your choice) until golden brown.  Adjust heat so rabbit doesn't burn.
Place the seared rabbit over the aromatics in the slow cooker.
Pour 1/2 of the white wine into the hot skillet and scrape up the browned bits from the bottom, allowing the wine to reduce by half.  Pour this over the rabbit.
Sprinkle the remaining bacon pieces over the rabbit followed by the remaining sprigs of thyme.
Pour the chicken stock and remainder of the white wine into the slow cooker, put the lid on and set the cooker to High for the first 4 hours, then to Low for 4-6 hours thereafter.
If necessary, it's okay to turn the rabbit over once or twice during cooking.
When the rabbit is tender, turn the slow cooker off or set it on Hold.  Using tongs, remove all the thyme stems.
Transfer the rabbit to a warmed plate and divide into individual portions.  Spoons the onions, garlic and juices over and around the rabbit and bring it to the table.

Cook's Notes:
Had I been feeling better, I'd have cut the rabbit into serving pieces before searing and cooking. I think it would be much more manageable that way.  That said, this wasn't all that unmanageable.
Watch out for bones:  this isn't chicken (or maybe you used a chicken?), rabbit bones are tiny. 


Copyright © 2005-2012, Christine Cooks. All rights reserved

Sunday, January 10, 2010

Earthquake Country Plus a Recipe for Roasted Cauliflower and White Cheddar Cheese Soup with Fresh Marjoram

6.5 on the Richter scale is the official measurement of yesterday's earthquake that shook us up around 4:30 in the afternoon.

Sitting in my office chair, I felt a big jolt as if something had hit the building, a pause, the power went out, then bigger jolts, jumps, lateral shaking that scooted my chair several feet away from my desk, rolling - all lasting way too long.

This was a big one.

By that time I was up and out of my chair yelling up the stairs to Mr CC asking if he was okay - my heart pounding.

I'd experienced big earthquakes before in Chile and Argentina. Some of them rumbling through like a freight train on steroids, some of them the toss-you-against-the-wall type. But in all the years I've lived here, through all the earthquakes that happen fairly regularly, I'd never felt one like this. It had it all: that vertigo-inducing rolling, jumping up and down, shaking side to side. It was unreal; hard for the brain to grasp.

Amazingly enough, no damage occurred chez nous; nothing jumped off shelves or walls. Unlike Ferndale, parts of Eureka and Arcata, who all sustained some damage, we live on a rocky marine terrace above Trinidad and somehow escaped the worst of it. Thankfully, no people were badly hurt and no tsunami followed the earthquake - something we are all too aware is a possibility in our triple-junction corner of the world.


So with no power and darkness beginning to fall, we invited neighbors over to share the evening and a pot of soup with us. My trusty 1950s-era Wedgewood gas stove never fails to do the task assigned to it. That I couldn't use my stick blender as originally planned became a non-issue; the potato masher did a fine if more rustic job. The light and warmth from 25 candles, our good friends, a bottle of red wine, and the hand-cranked radio to give us updates, we were doing pretty well.


Roasted Cauliflower & White Cheddar Soup With Fresh Marjoram
Christine's original recipe
(print recipe)
Ingredients:
2 medium-sized heads cauliflower, separated into florets (organic and local is always best)
1 large yellow onion. peeled and chopped
2 Yellow Finn potatoes, cut into 1-inch pieces (yields 3-4 cups)
1 tablespoon (more if you wish) fresh chopped marjoram or 2 teaspoons dried
1/2 cup white wine
6 cups chicken stock (preferrably your own, but a good organic, low sodium broth will work just fine)
olive oil
unsalted butter for the pan
1 tablespoon kosher salt (more if necessary) and numerous grindings of black peppercorns
3 cups coarsely grated white cheddar cheese
Preparation:
At least 1 hour before starting the soup, put the cauliflower florets in a roasting pan with a drizzling of olive oil, cover the pan with foil and roast in a 400-degree oven for 30 minutes, shaking the pan occasionally.
Remove the foil and continue to roast the cauliflower until it is tender - about 20 minutes more. You may need to add a bit more olive oil to prevent sticking and you may need to adjust the heat in your oven to prevent burning.
Begin sautéing the onions in about 1 teaspoon each olive oil and butter in a large pot over medium heat. Sauté until the onions are tender. Adjust the heat so they don't burn.
Toss in the white wine and give it a stir.
Add the potatoes, chicken stock, salt, pepper and marjoram to the pot and cook over medium high heat, partially covered until the potatoes are tender.
Add the cauliflower and stir to blend and heat.
Remove the pot from the heat and, if your power is out, mash the soup with a potato masher until all the chunks are broken up.
Alternatively, run the soup through a food mill if you have one. Something I could have done but was vetoed from doing so by the hungry mob.
If you have lots of power, use a stick blender to make your soup smooth and creamy.
At this point you might need to add more chicken stock if your soup is too thick.
Taste and add salt and more pepper if desired.
Stir in the grated cheddar cheese until it is fully melted.
Et voila!, you are ready to sit around the table with candle-power all around you, great friends to talk to and share the events of the day with, and a hearty soup for the earthquake-stressed soul.


What could be better?


Copyright © 2005-2009, Christine Cooks. All rights reserved

Monday, December 28, 2009

Eggs, Cardamom and a Recipe for Sugar Free Cardamom Custard Cups

My chickens just won't stop laying eggs.
I'm not complaining. I love our eggs and I love our sweet hens. There's not a crabby one in the bunch.
I'm rather astounded, actually. Out of 12 laying hens, I regularly get 6 to 10 eggs a day - in the coldest and darkest days of winter!

I consider myself one very lucky cook.

Still, this is far too many eggs for 2 people to consume. I sell them to friends. This Christmas I gave some away as gifts. And I've still ended up with too many eggs.


Now, Mr CC luvvvs custard - which he gets fairly often in the form of home made ice cream. But when I was moaning about what to do with so many eggs, he asked would I make cooked custard - you know, in cups? Right there I was off and running . . . mentally using up as many eggs as I could manage.
Not content to make just any custard, my nose went hunting through the spice closet and came up with - cardamom.
Cardamom is such a regal spice. Kind of citrus-y, minty, licorice-y . . . no, that doesn't really describe. It has a flavor all its own: deep and warmly aromatic when crushed; a bit ethereal thereafter, leaving you wondering just what was that perfume?

Traditionally used in sweet breads and cakes, cardamom is also an ingredient in many types of chai. It's also used medicinally as a digestive aid in many parts of the world.

In my humble opinion, one should only buy cardamom from an organic source and in its cute little green pod. The flavor and freshness will last longer. For me, ground cardamom is for garnish only.


Christine's Recipe for Sugar-Free Baked Cardamom Custard Cups
(print recipe)
Recipe may be cut in half
Ingredients:
10 egg yolks (see Cook's Notes)
4 cups 2% milk
7 packets of Splenda (or more to your liking) (equals approx. 4 1/2 tablespoons sugar)
16 cardamom pods, split, seeds removed (yields 1 scant teaspoon seeds)
Ground cardamom for dusting
Preparation:
Place cardamom pods in a mortar and pestle and lightly pound until pods open.
Remove the seeds and discard the pods. Set the seeds aside in the mortar.
Lightly whisk the egg yolks then add the milk and the Splenda, whisking to blend.
Crush the cardamom seeds until they are broken up and their aroma is released then whisk into the milk mixture.
Allow the mixture to steep for about 20 minutes.
Meanwhile, preheat your oven to 275-degrees.
Lightly spray 6 to 8 4-ounce custard cups with non-stick spray. Wipe each cup with a paper towel to take up the excess and evenly distribute the spray.
Gently whisk the milk-egg mixture then pour through a fine mesh strainer into each custard cup to within 1/2-inch of the rim.
Transfer cups to a large baking pan and pour hot water into pan to come halfway up the custard cups.
Dust the tops of each custard with ground cardamom, if desired. (See Cook's Notes)
Bake in the oven for 60 minutes or more, or until a knife slipped into the center of a custard comes out clean.
Remove from the cups from the water bath (bain marie) and place on racks to cool completely.
Refrigerate for up to two days.


Cook's Notes:
Ten egg yolks to 4 cups of milk will make a very soft, creamy custard. If you prefer yours firmer, use 8 egg yolks instead.

To dust the custards with the ground cardamom, place a teaspoon or so of the ground spice in a small, fine mesh sieve. Prior to baking, hold the sieve over a custard and lightly tap the side of the sieve. The spice will fall to the top of the custard. Repeat for all the cups then bake.

The ultimate comfort food, my mother would make us kids baked custard when we were recovering from colds, flu, measels, and mumps. I can still smell the aromas of the cinnamon and nutmeg that she sprinkled over the top of each cup and that permeated the kitchen as the custards were baking.


Copyright © 2005-2009, Christine Cooks. All rights reserved

Sunday, December 14, 2008

Tapioca Pudding With Blueberries And Chocolate Shavings

Did your mom make you tapioca pudding as a child? Expecially when you were not feeling well? Mine did. The "quick" tapioca from the red and white box. I would watch her work her alchemic magic at the stove, stirring and stirring those small white granules into sweet warm comforting goodness. And when I grew up and had children of my own, I carried on the tradition (nod your heads here, boys) never giving a thought as to what those little white granules were. Not that they were bad, but...
Enter Let's Do... Organic small pearls tapioca. Lovely round white pearls that cook up in minutes and make a pudding that can be as fat, dairy and sugar-free as you desire. Compared with the recipe on that venerable red and white box, no eggs, no butter, no cornstarch, minimal sugar. Make this just once and I can almost guarantee that it will inspire you to experiment further, it's that simple and inspirational.

Small pearls tapioca are available at most well-stocked grocery and health food stores. I recommend that you find an organic, preferrably non-GMO product.

Combined with anti-oxident rich blueberries and shavings of dark chocolate, this pudding will warm your soul on a cold winter's night.

Tapioca Pudding with Blueberries and Shaved Chocolate
Inspired by the recipe on the box
Ingredients:
2 cups water
3 tablespoons (heaping) small tapioca pearls
2 tablespoons Splenda-Sugar blend (or 2 tablespoons sugar)
pinch salt
3/4 cup low-fat milk (you can use half n half or canned milk, or coconut milk for a vegan dish)
Preparation:
Bring water to a boil over high heat. Slowly whisk in the tapioca pearls, stirring so they don't stick together.
Reduce the heat to medium high and continue to cook for about 15 minutes until the pearls begin to lose their opacity and the water gets cloudy.
Meanwhile, combine the milk, sugar and salt in a measuring cup and stir well.
Whisk the milk mixture into the tapioca pearls and cook over medium low heat for an additional 5 minutes or until the pearls are soft and translucent.
Remove from the heat and allow to cool for a few minutes.
Pour the pudding into a glass bowl, stir well, cover with plastic wrap if desired, and refrigerate until it has come to room temperature. The pudding will thicken as it cools, becoming thicker still if allowed to get refrigerator cold.
To serve:
Give the pudding a quick stir to fully incorporate the liquid with the pearls. Spoon some blueberries (I used our frozen stash from this post) into a dish then spoon a layer of tapioca pudding over them. Repeat layering one more time, topping the whole thing with a few more blueberries and a generous shaving of dark, organic chocolate. Prepare to be comforted.


Copyright © 2005-2008, Christine Cooks. All rights reserved