Friday, April 30, 2010

Sautéed Savoy Cabbage with Fennel, Spring Onion, Green Garlic and Orange Peel

I don't always enjoy the weather here in our northern climes.  Sometimes I'm really grumpy about the rain.  And sometimes I'm awfully tired of being cold.  But when I can walk into my local co-op grocery store from October to right now, and buy a beautiful head of locally grown savoy cabbage, I get all warm inside.

We've been eating a lot of this stuff.  It's sweeter and crunchier than those big round balls of green and purple cabbage that go into cole slaw, cooks up quickly, makes a beautiful bed for roasted fish, is a nutritious filler for stir-frys, its crinkly leaves can be parboiled and stuffed (oh, just gave myself an idea), and it can even be eaten raw.
Back here when I roasted the duck, I said I would post the cabbage you see on the plate. So even though I didn't get a good photo of it, then or since, I think the recipe is so fine that I'm going to make good on my promise.  Then you can take your own photo.

I used a Cara Cara orange in this recipe, a short season variety that is no longer available up here. If you can't find one, substitute Meyer lemon, navel orange, or sweet tangerine peel.  Be sure to remove all the bitter white pith from the inside of the peel, then slice it finely into 1 to 2-inch strips.

Fresh fennel, spring onion and green garlic are always in my fridge this time of year; I can't get enough of them.  If you have access to them in your area, go get 'em.  They are such a compliment to so many spring dishes, not the least of which is this simple and quick sautéed melange.

Everything is thinly sliced before sautéeing.  To prepare the cabbage, cut the head in half and cut out the solid core. I found that cutting it into quarters made the slicing easier.

Cut the fronds from the fennel bulb and peel the outer layer if it's tough. Cut it in half and thinly slice crosswise.

Remove the outer layer of skin from both the spring onion and green garlic, slice off the roots and thinly slice the bulbs up to the neck of the stalk for the onion, and up to where the white goes pink then turns to green for the garlic.


Sautéed Savoy Cabbage with Fennel, Spring Onion, Green Garlic & Orange Peel
(print recipe)
Christine's original recipe
Ingredients:
1 medium head savoy cabbage, thinly sliced
1 spring onion, thinly sliced
1 green garlic, thinly sliced
1/2 of a fennel bulb, thinly sliced
Peel from 1/2 of a Cara Cara orange, thinly sliced
Juice from 1 Cara Cara orange
Olive oil for the pan
Fleur de sel and freshly ground black pepper to taste
A dash of dry white wine wouldn't hurt either (what can I say? I just add when the whim hits me, and I don't measure.)

Preparation:
Heat a heavy skillet over medium.  Add several teaspoons of olive oil.
Sauté the fennel, onion and garlic until softened, about 3 minutes. Adjust the heat so it doesn't burn.
Add the orange strips and toss to coat.  Add the cabbage, orange juice and white wine, if using, and toss with tongs until the cabbage is coated with the liquid.
Sauté for 4 to 5 minutes, turning often with the tongs.  When the liquid is but a glaze in the bottom of the pan, the cabbage will be wilted but with a slight crispness to it.
Remove the pan from the heat, season with sea salt and fresh ground pepper if desired.  Serve while it's hot.

Happy Eating! 


Copyright © 2005-2010, Christine Cooks. All rights reserved

Thursday, April 29, 2010

Oven Roasted Halibut Fillet with a Relish of Blood Orange, Meyer Lemon, Green Garlic and Spring Red Onion

Slender stalks of green garlic and tender spring onions are fleeting seasonal delicacies that should be snatched up from your green grocers or farmers markets while they are still available.

Green garlic is a mild immature version of its grown up dried self, pulled from the ground before its bulbs form, and can be used now in fish dishes, light soups, sauces, and relishes such as the one featured here.
Spring onions are simply yellow, white or red onion youngsters; slim and delicate, mild and sweet.

Pair these two kids with the puckery flavors of blood orange and Meyer lemon and you've got a mouthwatering topping for a thick mild white fish like halibut. Cod, rockfish and sablefish will work just as well, but may take less time to roast depending on their thickness.

The cooking method used here is fast and easy.  Prepare the relish while the halibut is roasting in the oven; they will both be finished at the same time, ready to serve in about one-half hour from prep to plate.
A perfect springtime weeknight offering.

Roast Halibut Fillet with a Relish of Blood Orange, Meyer Lemon, Green Garlic and Spring Red Onion
Christine's original recipe
(print recipe)
Ingredients:
1-pound piece of halibut fillet
1 large Meyer lemon
1 small blood orange
1-2 tablespoons olive oil
3/4 teaspoon gray salt with herbs (sel gris aux herbes)
2 sprigs fresh oregano plus 1 tablespoon fresh oregano leaves, chopped
1/3 cup dry white wine
1 green garlic stalk and 1 spring red onion stalk

Halibut Preparation:
Preheat oven to 375 degrees.
Oil the bottom of a ceramic baking dish. Set aside.
Rinse fillet under cold water and gently pat dry.
Place fillet in baking dish, skin side down (skin removed) and rub the top with olive oil.
Sprinkle the fillet with the herb salt and cover the top of the fish with lemon slices. Reserve the remainder of the lemon.
Lay the oregano sprigs over the lemon slices.
Roast for 15 to 18 minutes or until the fish is cooked through but still very moist. It should be springy when pushed with your finger.

Meanwhile ...

Relish Preparation:
Wash both the green garlic and the spring onion stalks. Remove the outer layer of skin from each, slice off the root ends and thinly slice each one crosswise until you reach the neck.  (The necks may be saved for soup stock.)
Using a sharp knife and working over a bowl to catch the juices, remove the skin, seeds, white pith and membrane from the blood orange and the remainder of the Meyer lemon. Chop each citrus separately, reserving juices.
Heat a skillet over medium low and add 1 teaspoon or so of olive oil.
Sauté the green garlic and spring onion slices for about 1 and 1/2 minutes, stirring to separate the rings, until they are softened but not browned.
Add both chopped citruses and their juice to the pan, stir and sauté 2 minutes more, stirring frequently to prevent sticking.
Add the white wine, stir, turn the heat up to medium high and cook until the liquid is reduced by one half.
Stir in the chopped oregano and continue cooking until the pan is almost dry, 1 minute more.
You may have to adjust the heat as you go along to prevent the relish from burning.
Remove the pan from the heat.
To serve, remove the oregano sprigs and lemon slices from the roast halibut and slice the fish into serving size pieces.  Place on warm plates, top with the relish and a few more sprinklings of herb salt.

Enjoy! 


Cook's Notes:
Sel gris aux herbes may be found in my Amazon store. Click on the link in the sidebar.

Copyright © 2005-2010, Christine Cooks. All rights reserved

Thursday, April 22, 2010

Gently Sautéed Fresh Asparagus with Sel de Guérande and Meyer Lemon

The simplest plate of a single vegetable is sometimes the best plate on the table.

I'm a staunch proponent of roasting vegetables to bring out their flavors and concentrate their sweetness and I dearly love to roast asparagus.  But these California babies are sautéed and boy are they delicious.

Good olive oil, sel de guérande, a squeeze of Meyer lemon juice - those and the freshest asparagus you can find along with a light hand with the sauté pan are all you will need.

Oh Happy Spring!

Sautéed Asparagus with Sel de Guérande and Meyer Lemon
Ingredients:
1 pound fresh asparagus
1-2 teaspoons good, fruity olive oil
A pinch or two of a good fleur de sel (French sea salt, see my sidebar)
Juice from 1/2 of a small Meyer lemon plus extra wedges for serving
Preparation:
Gently wash the asparagus under cool water. Pat dry with a dish towel.
Pick up a spear with both hands, holding it as if you were going to bite into an ear of corn.
Gently bend the spear and allow it to snap where it wants, using your thumbs to help bend the spear. (This ensures that the woody end will not end up on your plate. If your asparagus spears are very thin and don't have woody ends, you could lay them out on a cutting board so the bottom ends align, then cut off about one inch of those ends.)
Heat the olive oil in a heavy pan 12-inch pan (I use cast iron for this) over medium high.
When the oil is hot but not smoking, lower the heat to medium, add the asparagus in a single layer, sprinkle with a generous pinch of sea salt and let cook for 2 minutes, shaking the pan occasionally to coat each spear with olive oil.
Using tongs, gently turn the spears so they can cook on all sides, no more than another 3 minutes. The spears should be easy to bite into with just a little resistance - in other words, al dente.
Remove the pan from the heat and squeeze the lemon juice over the spears. Shake the pan to distribute the juices and using the tongs, transfer the asparagus to warm plates.
Sprinkle with another pinch of sea salt if desired and serve with additional wedges of Meyer lemon.

Bon appétit!


Copyright © 2005-2010, Christine Cooks. All rights reserved

Friday, April 16, 2010

Sugar Free Blackberry Cabernet Ice Cream

In order to make this, you will first have to make this.  Yes, the sauce that was made for the duck that inspired the ice cream.  Sure, I could have saved the sauce for seared salmon, or chicken cutlets like Sophie may do, or pork chops.  But ice cream ...  it just screamed for ice cream.  (I know, I can see your eyes rolling.)

Not a lot of talk here.  You'll want to get started on that sauce.  Think deep, rich red wine and blackberry reduction with heady notes of fresh ginger, rosemary, cracked black peppercorns, all wrapped up in a cold, palate-pleasing post prandial scoop.  And please, use a good cabernet.  It will make all the difference between a so-so sauce and a knock your socks off sauce.

Sugar Free Blackberry Cabernet Ice Cream
Christine's original recipe
(print recipe)
Ingredients:
2 cups 2% milk
3 egg yolks
9 packets Splenda (6 tablespoons sugar for you non-Splenda users), more if you want it sweeter
1 cup Christine's Blackberry Cabernet sauce, strained
1/2 to 1 cup heavy cream

Preparation:
Bring the milk to a simmer on low heat until bubbles form around the edge of the pan. Romove from heat.
Meanwhile, beat the egg yolks with an electric mixer until the yolks begin to turn pale yellow.
Add in the Splenda or sugar and continue beating until the yolks are thickened and form ribbons when dripping from the beaters.
Using a whisk, mix one-third of the hot milk into the egg yolks then gently whisk this back into the remaining milk in the saucepan.
Heat gently over low heat, stirring constantly with a wooden spoon.
Do not allow mixture to boil.  It is ready when the custard coats the back of the wooden spoon and you can run a track through it with your finger that won't disappear.
Remove the pan from the heat and allow to cool for about 10 minutes.
Gently whisk the strained blackberry cabernet sauce into the custard, mixing thoroughly.
Chill for at least 4 hours or overnight.
Gently whisk in the cream just before processing. See Cook's Notes.
Process in your ice cream maker according to the manufacturer's instruction.

Cook's Notes:
The reason the ice cream in the photos above are sporting ice crystals is because I, um, forgot to add the cream. This particular batch resulting in ice milk.  And while Mr CC and I like the lower calorie properties of ice milk, you might just want to add the cream ... like I tell you to do in the recipe.  One of those do as I say, not as I do things. I'm just sayin'.
I have a negative thing about overly sweetened ice cream and sorbet.  In my opinion, commercially processed products have far too much sugar in them, even the ones that use Splenda.  That said, I will also admit that my frozen desserts may not be sweet enough to the average bear, so add more Splenda, sugar, whatever to result in the sugar rush you desire. Just the right amount will bring out the flavors of your ingredients; too much and you will have a cloying sugar taste - something I obviously strive not to achieve. 
Copyright © 2005-2010, Christine Cooks. All rights reserved

Friday, April 9, 2010

Blackberry Cabernet Sauce with Rosemary, Ginger and Tellicherry Pepper


This is the sauce
that accompanied the duck
that we ate for Easter dinner.


It was painted on the duck at the end of roasting, then a pool of it was placed under the slices of duck on our plates.  Great idea. Great sauce. Good side dishes.  But the duck sucked.

What can I say?  It did.  Could have been the duck, could have been the cook.  I'll have to try it again to find out.


So this photo?  Forget the duck.  This photo is to point out the next post. That would be the savoy cabbage with fennel and slivers of cara cara orange peel.

 
The sauce now ...  what a delight.  As soon as I realized there would be a lot left over from the duck fiasco, I knew I would make ice cream...  And so I did...  And that post is coming along soon.

Blackberry Cabernet Sauce with Rosemary, Ginger and Tellicherry Pepper
Christine's original recipe
(print recipe)
Ingredients:
4 heaping cups of blackberries (from last summer's crop that you found in the bottom of the freezer several days ago, thawed.)
2 cups good Cabernet Sauvignon
2 stems fresh rosemary, leaves pulled from stems
3-inch piece fresh ginger, peeled and chopped fine
1/2 cup fresh orange juice from a Cara Cara orange
6-8 Tellicherry peppercorns, lightly crushed in a mortar

Preparation:
Combine all the ingredients in a large saucepan and bring to a very low boil.
Maintain a low boil for about 1 hour or until the liquid has reduced by one-half.
Taste and adjust with a bit of sugar or a pinch of salt if necessary.
Strain into a glass measuring cup, pressing on the solids to release all the liquid and flavors.
Store in the fridge if making in advance.
Serve with roast duck, salmon, or lamb chops, OR ...  make ice cream!


Happy Cooking!


Copyright © 2005-2010, Christine Cooks. All rights reserved

Friday, April 2, 2010

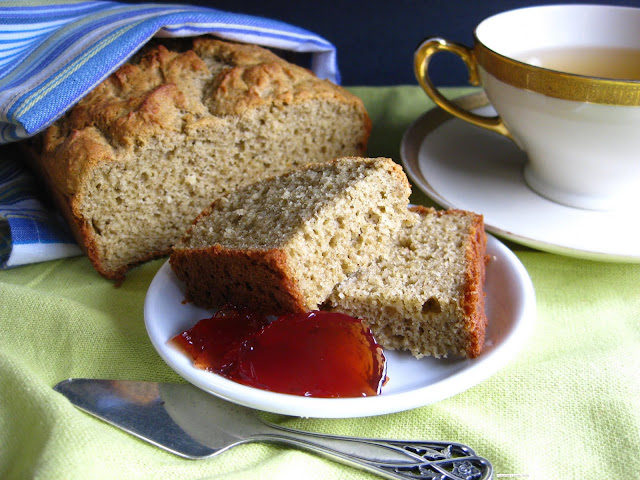
Gluten Free, Sugar Free Buttermilk Tea Bread

I cannot take the credit for this luscious gluten free tea bread.  That would go to Britt of GF in the City.

Yep. I took her recipe, left out the bananas, made a few other changes, and offer it to you here - with no credit to myself.

I've said before that I didn't inherit the baking genes in my family.  Those belong mostly to my sister Di, with sister Cyn running a close second.  So when I want to bake, unless it's a dirt simple recipe like this, I go recipe hunting.

For anyone who eats gluten free and occasionally gets cravings for a nice slice of moist, slightly sweet bread with their afternoon tea, this is the loaf to make.  It's easy to whip up and may be stored in the fridge for a week or so, or in the freezer for several months.  What are you waiting for?

Gluten Free, Sugar Free Buttermilk Tea Bread
Recipe adapted from GF in the City
(print recipe)
Ingredients:
1 cup sweet white sorghum flour
1/2 cup finely ground almonds, or almond flour
1/4 cup potato starch
1/2 teaspoon xanthan gum
2 teaspoons baking powder
1/2 teaspoon baking soda
1/2 teaspoon salt
1/3 cup unsalted butter, room temperature
12 packets Splenda or 1/2 cup sugar if preferred
2 eggs
3/4 cup buttermilk
Preparation:
In the bowl of an electric mixer, cream the butter and Splenda until smooth and creamy.  Add the eggs, one at a time and beat well.
In a separate bowl, combine all the dry ingredients, stirring with a whisk to incorporate.
Adding the dry ingredients first and last, alternate dry with the buttermilk until all of it has been used.  Beat thoroughly.
Put batter into a large loaf pan that has been sprayed with a non-stick spray and bake at 350-degrees for about 45 minutes.  When the bread is done, the top will be golden and crusty and a toothpick inserted into the loaf will come out clean.
Allow the loaf to rest in the pan for about 5 minutes then turn onto a rack to finish cooling.

This bread holds its own in a toaster so if you're toast-deprived like I am, give it a try.

Happy cooking!


Copyright © 2005-2010, Christine Cooks. All rights reserved