Showing posts with label fruit. Show all posts

Friday, July 15, 2011

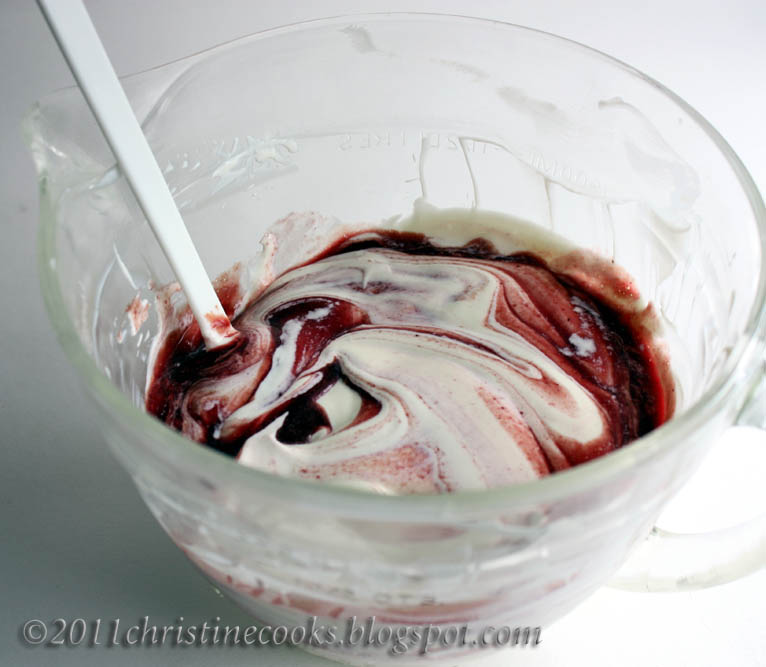
Recipe for Vanilla Frozen Yogurt with Raspberry Swirl


I coulda made this with fresh organic raspberries.

I coulda driven the 12 miles to get them - 24 miles round trip.

Coulda, but I didn't.

Instead I had a Trader Joe's moment:  organic raspberry spread and raspberry wine; both in the fridge, both cold.

It took just 5 minutes to put this together plus 20 minutes to freeze.

It could be in your dessert bowls tonight . . .

Vanilla Frozen Yogurt with Raspberry Swirl
Christine's original recipe
Ingredients:
4 cups plain, organic whole fat yogurt (low fat is fine)
2 teaspoons pure vanilla extract
1/3 to 1/2 cup sugar (or 8 to 12 packets Splenda)
4-ounces raspberry fruit spread
2 tablespoons raspberry wine


Preparation:
Combine the yogurt, vanilla and sugar in a large mixing bowl, stirring until the sugar is dissolved. Keep very cold until ready to freeze.
Combine the raspberry wine and raspberry fruit spread in a small measuring cup. Cover and keep cold.
Freeze the yogurt mixture in your ice cream maker according to the manufacturer's instructions.
When the yogurt is frozen, place one-third of it in a lidded container that can go into your freezer, spoon 1/2 of the raspberry mixture over that, then spoon one-third more of the yogurt over the raspberry layer, and repeat with the remaining raspberry mixture ending with the last third of the yogurt on top.
Cut down through the yogurt a few times with a knife. Smooth the top.
Place a piece of plastic wrap directly on top of the yogurt to keep ice crystals from forming then snap on the lid and freeze for several hours until ready to serve.  Can be frozen overnight but if that's the case, bring it out and set it on the counter 1/2 hour before serving so it can soften.

I like my frozen yogurt on the tart side. If you like yours sweeter, add up to 2/3 cup sugar.
I think that using whole milk yogurt works best to achieve creaminess, but low-fat and non-fat will work also although they will freeze to a brick.
As can be seen on other frozen yogurt posts of mine, I usually drain the whey from the yogurt before preparing the recipe.  I decided to not do this here to see how it would turn out. It turned out just fine.  Maybe not as creamy, but fine nonetheless.
The Trader Joe's link in this post is not a promotion and I do not receive renumeration for it; it is there so you can see what the product looks like.  Sorry I couldn't find a photo for the raspberry wine, but TG's carries it with their label at about $8 a bottle.


Copyright © 2005-2011, Christine Cooks. All rights reserved

Monday, March 14, 2011

Recipe for Sugar Free Meyer Lemon, Fresh Blueberry Swirl Frozen Yogurt Creamsicles


Let's get this whole sugar free business out of the way right now.

Yes, I did not add any sugar.

Yes, you can substitute sugar for the Splenda if you wish, and I have even given the sugar equivalent in the recipe below.

No, these are not totally, absolutely, positively sugar free.

Fruit has natural sugars in the form of fructose.

Dairy has natural sugars in the form of lactose.

Natural sugars existing in whole foods - fruits, vegetables, dairy - are a good thing. They come in their own natural packaging, often with lots of fiber.

Industry-packaged foods often mostly have added sugars, the worst being high-fructose corn syrup, and don't let them tell you otherwise.  They lie.

Still, I had a hard time adding the term sugar free to the title of this recipe, cuz it just ain't so.  There's fruit sugar and dairy sugar in abundance.  But no added sugar.  And, yeah, there's Splenda with its teeny-tiny amounts of glucose and maltodextrin, which translate to sugars.  I'm not perfect.

Whew.  Glad I got that off my chest.  Let's move on.

These are my little ode to Spring.  I had so much fun making - and, obviously - eating them.  Notice I have not called them fat free. You will see why as you read on.


What began as a formulation for Meyer lemon frozen yogurt creamsicles, which I'd been thinking about for quite some time while waiting for my frozen pop mold to arrive from Amazon (thank you Jeff & Amy!), acquired a blueberry swirl when organic blueberries from Chile began to show up in our local markets.  Carbon footprint be damned, I could not resist.

These frozen treats are packed with tartness from both the Meyer lemon juice and the yogurt, with just enough Splenda (or sugar) for balance.  The addition of the fruit swirl provides its own sweet surprise.

Before you start, please remember to drain the yogurt of its whey before proceeding (a photo of that process is here). And be sure to read my notes below for a way to use that whey.

Using a pestle to push the blueberry purée through a fine mesh sieve worked better than anything I've ever tried. It really got all the liquid out of the fruit pulp.  A word of caution: empty the sieve of any remaining pulp right away or you may later find yourself scrubbing that little screen really hard.
 
Fold the fruit purée into the yogurt mixture just a few times to make the swirl. Too much combining and you've lost the swirl effect.

Spoon or pour the yogurt mixture into the molds, using a skewer to remove trapped air.  When the molds are filled, tap the aparatus on a counter top a few times to settle and compact the mixture then put the sticks into the center of each mold, about halfway in.  Put the whole thing in the freezer, on a flat surface, and freeze for at least 8 hours or overnight, which I think is best.

You will have to excercise some patience.

Sugar Free Meyer Lemon, Fresh Blueberry Swirl Frozen Yogurt Creamsicles
Christine's original recipe
Ingredients:
4 cups (32-ounce container) plain yogurt (I used full fat), drained
3 tablespoons Meyer lemon juice, strained
1 cup cream or half 'n' half (see Cook's Notes)
1/2 teaspoon Tahitian vanilla
8 packets Splenda or 1/3 cup sugar (more to taste)
3/4 cup fresh blueberries (yields 1/4 cup blueberry purée)

Preparation:
The day before preparing the pops, drain the liquid, or whey, from the yogurt. (See Cook's Notes for uses for the whey.)  To do this, drape a damp piece of cheesecloth over a sieve that has been set over a large glass container, such as an 8-cup measure.
Spoon or pour the yogurt into the cheese cloth then set the whole thing in the fridge and allow it to drain overnight.
Put the drained yogurt, or yogurt cheese as it is called, into the rinsed 8-cup glass measure or a large bowl and stir in the lemon juice until fully blended.
Stir in the cream and vanilla then the Splenda, or sugar.  If using sugar, stir the mixture until it begins to lose its grainy feel.
You should now have about 5 cups of yogurt mixture; put this in the fridge and continue with prepping the blueberries.
Place the blueberries in a food processor and buzz until they are well puréed; they will not be a liquid at this point.
Scrape the purée from the processor bowl into a very fine mesh sieve placed over a small glass measuring cup.  Then, using a small pestle, stir, stir, stir until all the liquid falls into the measuring cup leaving very dry  pulp in the sieve. I started out using the back of a spoon for this process but soon found I was wasting my time, hence the pestle which did the job quickly with maximum extraction of liquid.
Drizzle the liquid blueberry purée over the yogurt mixture and give it a quick stir with a rubber spatula. Don't overmix as you want the blueberry to be a just a swirl, not a complete color changer.
Spoon this mixture into the molds of a frozen popsicle container, removing air pockets with a smooth bamboo skewer or one of the popsicle sticks that come with the mold.  (It's important to do this because trapped air will cause the creamsicles to form ice crystals within and will result in not being a creamy smooth frozen treat.)
When the molds are filled. Tap them on a counter top to compact the yogurt mixture then place the pop sticks in the center of each mold and freeze until very firm - overnight is best if you can stand the wait.
To un-mold the pops, fill a large container or sink with hot water. Put the molds in the water to within an inch of the top for no more than 5 seconds, then remove from the water.  You may have to squeeze each individual mold with your hands to help the frozen yogurt within separate from the mold. You may also need to re-dip into the hot water several times to get the pops to un-mold.  Placing your fingers on the pop stick, close to the frozen yogurt, pull up gently until the pop releases from the mold.

Go ahead, take a bite.  I'll wait.

To store the creamsicles (as if), wrap each one in its own piece of plastic wrap and layer them in a ziptop freezer bag and put them back in the freezer.  Pull one out when you get a yen for a lip-smackin', tart-sweet, frozen fruity treat.

As is abundantly clear from the recipe, this is not a low-fat frozen treat. However, having made this, I think I can safely say that you could successfully lower the fat content by substituting low-fat yogurt and low-fat milk for some of the cream or half 'n' half without compromising the structure of these so aptly-named creamsicles.

8 packets Splenda equals 1/3 cup sugar.  12 packets Splenda equals 1/2 cup sugar.

Yogurt whey may be used as a substitute for buttermilk in baking with great success.  I just made a batch of gluten-free buckwheat pancakes this morning and used the leftover yogurt whey instead of buttermilk.  It worked splendidly and I plan to post a recipe soon.
Happy cooking!


Copyright © 2005-2011, Christine Cooks. All rights reserved

Thursday, August 26, 2010

Figs Poached in Port and Thyme Over Creamy Yogurt Cheese Plus a Fig Giveaway

(Update: August 30th 8:19 PM - With help from random.org, a winner of the fig giveaway has been picked!
Drumroll . . . . . . . . .    Congratulations Lindsey!  And a big thank you to all of you for joining in the fun.)


Mr CC and I are eating figs these days. Fresh, juicy, oozing-figgy-syrup California figs. They are impossibly delicious.

Mostly we eat them out of hand; unadorned, as you see above.  Did you know that figs are filled with antioxidants, are free of fat, cholestrol and sodium and are an excellent source of fiber?  Yes they are.  Eat them with the skins on for optimum health benefits.

The figs you see here were sent to me by the California Fig Advisory Board, who want to give away a box of fresh California figs to a randomly selected person who leaves a comment on this post.  The lucky winner will receive beautiful fresh figs delivered direct to her/his door!

 The deadline for this giveaway is Monday, August 30th at 5:00 PM, so please leave your comment soon. And please be sure to leave a way for me to get in touch with you in case you are a winner. 

I don't have a lot of time to cook these days, so I came up with this very quick and easy fresh fig dessert.
The poached figs came together in about 45 minutes from cutting to chilling.  Allow more time for the yogurt cheese as it has to drain most of its liquid to be firm enough to stand up to the weight of the figs.  I started preparation for this dessert in the afternoon and it was ready to serve by 7 PM.

The photo for this recipe does not do the dessert justice, but I promise you the result is delicious.  Give it a try and see if you don't agree.


Figs Poached in Port and Thyme over Creamy Yogurt Cheese
Christine's original recipe
Ingredients:
2 cups Greek-style yogurt (I used Strauss Family Creamery Plain Whole Milk Yogurt)
2 pounds fresh figs - I used 1 pound Black Mission and 1 pound green Kadota figs (about 28 figs total), cut into quarters
1/4 cup aged tawny port (I used Taylor Fladgate 20 year-old)
1/4 cup vanilla sugar (more or less depending on the sweetness of the figs)
1 tablespoon fresh thyme leaves
pinch salt
Preparation:
To make the yogurt cheese, dampen a piece of cheesecloth large enough to hang over the sides of a large strainer.
Line the strainer with the cheesecloth and set it over a large measuring cup or bowl.
Spoon the yogurt into the cheesecloth and place the whole thing into the fridge for several hours.
When the liquid has drained from the yogurt, you should have about half the amount of yogurt you started with. Keep cold until ready to use.
To prepare the figs, place the quartered figs, sugar, thyme, Port and salt in a medium saucepan, stir and heat until just bubbling.
Reduce heat to a simmer and cook over a heat diffusor for about 15 minutes or until the fruit is cooked through and a nicely thick syrup has formed.
Adjust the sugar to taste, remove from the heat, allow to cool for a few minutes then transfer to a large glass measuring cup and place in the fridge to cool until thoroughly chilled.
To serve, place a spoonful or two of yogurt cheese into a glass dish and top with the poached figs.

More figgy recipes coming soon!

Cook's Notes:
Vanilla sugar may be made by placing a split vanilla bean in a jar of baker's sugar (superfine), closing the lid, giving it a shake, and storing it until you need it. I leave the bean in the sugar until all the sugar is all used up; for me, that can be a year or more.


Copyright © 2005-2010, Christine Cooks. All rights reserved

Monday, August 9, 2010

Plum Cardamom Ice Cream

I love cardamom.

I especially love using whole seeds that have been extracted from their cute green pods.

When I bought plums last week, I made a gluten-free plum and cardamom galette, which turned out fabulously, thank you very much.

I saved some of the sliced plums from that recipe to make ice cream and when it came to deciding on a recipe, cardamom, this time using whole seeds, just seemed like the right flavor combination.

Plums are in season right now so get them at their peak. If you can, source them organically and locally.

I think you will like this.

Plum Cardamom Ice Cream
Christine's original recipe
(print recipe)
Ingredients:
2 cups (heaping) sliced fresh plums*
2 packets Splenda or 2 tablespoons sugar (or to taste), depending on how sweet the plums are
2 1/3 cups 2% milk
seeds from 4 cardamom pods, lightly crushed
2-inch piece vanilla pod, split
3 large or 4 medium egg yolks
1/4 cup Splenda/sugar blend*** or 1/2 cup sugar
1/2 to 3/4 cup heavy cream


Preparation:
Combine the sliced plums with the first measurement of Splenda or sugar and let sit for 15 minutes to juice.
Using a large saucepan, simmer plums over medium heat until they have cooked for at least 5 minutes.** Remove from the heat, cool 5 minutes then purée in a food processor. Set aside.
Meanwhile, heat the milk, cardamom seeds and vanilla in a large saucepan until bubbles form around the edge of the pan. Remove from the heat and allow to steep for 20 minutes to 1/2 hour. Remove the vanilla pod and strain the milk mixture through a fine mesh sieve. Put the milk back into the saucepan. You can scrape the vanilla seeds into the milk at this point if desired.
Beat the egg yolks with the remaining Splenda/sugar blend or 1/2 cup sugar until the yolks are a pale yellow and have thickened so the mixture falls in ribbons from the beaters.
Gently whisk 1/3 of the warm milk into the eggs until combined then whisk the egg mixture back into the milk and heat over medium low, stirring constantly, until it coats the back of a wooden spoon and your finger leaves a mark when run across it.  Remove from heat and allow to cool 5 minutes.
Gently whisk the puréed plums into the custard****, pour into a large glass dish or pitcher and refrigerate for at least 4 hours until thoroughly chilled (overnight is best).
Just before processing, stir the cream into the custard until blended, then process according to the  manufacturer's instructions of your ice cream maker.


* I used a combination of red and yellow plums that I had leftover from this recipe. They were sweetly tart, which I like. The amount of sugar you use for the ice cream will depend on the tartness or sweetness of the plums you use.

** I learned the hard way that some fruits must be cooked to reduce their acid affect on dairy.  I didn't do this with the first batch I made which resulted in a curdled custard. So, please, stew your plums.

*** I have also learned through trial and error that the addition of sugar to the beating of the egg yolks is pretty much paramount to ice cream success.  I'm not liking that this is true but I'm afraid it is.  So I use the least amount of Splenda-sugar blend that I can get away with.  It works for me and adds just a small amount of sugar per serving. As always, if you are not a Splenda user like I am, go for the sugar rush. I will not judge you.

**** Alternatively, you can add the plum purée to the ice cream while it is processing, resulting in a more ribboned effect.


Copyright © 2005-2010, Christine Cooks. All rights reserved

Tuesday, August 3, 2010

Gluten-Free Plum Galette with Cardamom, Sugar-Free or Not

I have a new god(dess) and her name is Carol.

A year ago when I went gluten-free, I tried my hand at making GF pancakes, pies, tarts, fruit galettes and more.  Some of them worked fine, others came out so-so and yet others were total disasters.  Mostly I couldn't get away from the "beany" taste and/or gritty texture that the flours I was using imparted, so I just gave it up altogether.

Sometime during the year I realized how much I missed pie crust.  Light, flakey pie crust.  It almost became an obsession.  I grew up on my mother's pies.  She taught me by example how to make flakey, light-as-a-feather crust.  I just had to find a way to make a GF pie or tart that sung to me.

Not too long ago my subscription link to Carol's blog Simply Gluten Free heralded her new GF flour.  A gluten-free flour that Carol guarantees can be used cup for cup like regular flour to make cakes, pies, cookies, breads, pastries, pizza(!), and more.

Was this to be my pie crust salvation?

I ordered some.  As soon as it arrived I made pie dough, rolled it into a large rustic circle and filled it with beautiful fresh plums.  I popped it into the oven.  I waited.  For 50 minutes I waited.  It was agony.

Finally it was time to remove the galette from the oven.  Then it had to cool ...  more agony.

Finally I cut a piece.  I took a bite...


Heaven!  It was heaven.  It had flake.  It had lightness.  It was delicious.

Carol, I bow to you.  You done good!

Gluten-Free Plum Galette with Cardamom
Christine's original recipe inspired by Carol Kacinski's Amazing All-Purpose Gluten Free Flour
(Print recipe)
Ingredients for pie crust:
1 cup gluten-free flour (see link above)
1 packet Splenda or 1 tablespoon sugar
tiny pinch salt
1/3 cup cold unsalted butter, cut into small pieces
2 tablespoons each cold heavy cream and cold water
Preparation:
Whisk together flour, sugar, salt.  Place in food processor and add butter pieces. Using quick pulses, process until butter and flour resemble fine sand, about 5-6 pulses.
Through the feed tube, add the cream in several pours while pulsing and stopping, pulsing and stopping, then add just enough water to make the dough come together. Pinch mixture between your thumb and fingers. If it holds together, it's ready.  Take care to not add too much liquid or your dough will be too wet.
Pour dough onto a sheet of plastic wrap, gather the edges of the wrap and make the dough into a ball.  Flatten the ball into a disc and refrigerate for 45 minutes to 1 hour.
Ingredients for plum filling:
10-12 ripe plums (yellow and red is nice), pits removed, cut into 1/4-inch slices. Makes approx. 3 cups* see Cook's Notes
Splenda packets or sugar to taste** see Cook's Notes
1/2 teaspoon ground cardamom
1 tablespoon tapioca starch
1 tablespoon cold unsalted butter cut into tiny cubes
heavy cream and vanilla sugar to finish the pie crust
Preparation:
While the dough is chilling, combine the plums, sugar, cardamom and tapioca starch in a bowl. Allow to sit at room temperature for 30 minutes for the plum juices to form.
Roll out the pie dough on a pastry cloth sprinkled with gluten free flour to a rough diameter of 14-inches.
Roll the dough up onto your rolling pin and center on a large parchment-lined baking sheet or pizza pan.
Place the plums (juice and all) in the center of the dough, spreading them to within 3-inches of the edges.
Dot the plums with the butter.
Fold the pie dough about 1/2-inch over itself, pleating and pinching if necessary, forming a smooth edge.  Bring the smooth edges of the dough about 3-inches over the plums, pleating as you go around, leaving a good portion of the plums showing in the middle of the galette.
Brush the dough with heavy cream and sprinkle with vanilla sugar. This is optional but makes for a nice crust.
Bake in a 380-degree oven for 45-50 minutes or until the crust is golden and the filling is bubbly.
Cool 30 minutes before cutting.
Eat and enjoy!  Then just think of the possibilities...


* I actually used 20 plums (10 red and 10 yellow) which made a total of 5 cups. I saved 2 cups of the mixture to make ice cream. Which will be coming along soon. ;)

** I have not provided a measurement for the Splenda or sugar because the amount you use will depend on how tart or sweet your plums are.  Add it sparingly and taste until it is to your satisfaction.  The plums I used were fairly tart so I added 7 packets of Splenda, which amounts to approx. 6 tablespoons of sugar, which is just under 1/2 cup. The finished fruit was tart with a sweet finish.

One more thing:  Just to keep the record straight, Carol doesn't know that I'm writing this post.  Well ...  she does now, now that I've published.  But there is no collusion here.  She didn't ask me to write this and I received no freebies for doing so. I'm just terrifically excited by the GF flour.


Copyright © 2005-2010, Christine Cooks. All rights reserved

Sunday, November 22, 2009

Christine's Recipe For Shaved Brussels Sprouts With Shaved Ham, Valencia Orange Juice and Chopped Walnuts

Brussels sprouts recipes abound among my food blogging friends this fall. And no wonder. These little Thanksgiving favorites are packed with goodness and cheerily allow themselves to be prepared in a plethora of ways, from roasting, old fashioned steaming, grilling, or sautéing.

Well I couldn't let myself be left out of the symphony of Brussels sprouts dishes now, could I?

So yesterday, as our local farmers market was celebrating its season finale and a wheelbarrow full of bright green sprouts was quickly disappearing into shoppers hands, I elbowed my way in, claimed my own, brought them home to my kitchen and came up with this recipe.

Wanting mine to be different from anyone else's recipe that I'd seen, I decided to shave my sprouts on a mandoline. Not stopping there, I added some shaved, uncured ham, and some shaved shallots. Lots of shaving went on in my kitchen, with nary a hair in sight.

After sautéing the shallots and ham, add the shaved sprouts and sauté, tossing with tongs, until they are wilted but still a bit crunchy. Add juice, toss some more, season with kosher salt and freshly ground black pepper. You're done. It's that simple. You can even make this a day ahead, allowing the flavors to deepen. Reheat in a low (300) until warmed through. Sprinkle with chopped walnuts if desired and serve.


Shaved Brussels Sprouts with Shaved Ham, Fresh-Squeezed Valencia Orange Juice, and Chopped Walnuts
Christine's original recipe
Ingredients:
2 dozen Brussels sprouts, cleaned and thinly shaved on a mandoline (yield approx 3-4 cups)
2 shallots, thinly sliced
1 cup shaved ham (see Cook's Notes)
1/3 cup fresh squeezed orange juice with pulp (Valencia is best for flavor)
olive oil and butter for the pan
Kosher salt and freshly ground black peppercorns to taste
Preparation:
Sauté shallots over medium heat in about 1 tablespoon each olive oil and unsalted butter. You can use more or less of the oils according to your taste.
When shallots are slightly golden, add the shaved ham and sauté until edges of the ham curl and become golden.
Add the shaved sprouts, toss to blend, and sauté until the sprouts are tender-crisp, about 4 minutes.
Add the orange juice and, using tongs, toss the sprouts well so the juice is evenly distributed throughout for another 2 minutes. The pan will be dry and all the juice absorbed.
Remove from the heat, adjust the seasoning with kosher salt and black pepper.
Sprinkle with fresh chopped walnuts and serve.

Cook's Notes:
The flavors of this dish deepen if made a day ahead. Leave out the walnuts, keep in the fridge then warm in a slow oven. Just before serving, sprinkle with the walnuts.
The orange juice not only compliments, but marries the ham and sprout flavors delightfully.
As I shaved the Brussels sprouts, using my very old mandoline, I made sure the stem end was facing up so I didn't shave it into the bowl. See photo.
Uncured applewood smoked ham steaks, my favorite, are made by Niman Ranch. No nitrites.


Copyright © 2005-2009, Christine Cooks. All rights reserved

Tuesday, November 17, 2009

Christine's Recipe For Brown Rice Medley Pilaf With Apples, Walnuts and Pomegranate Seeds

I love the Brown Rice Medley from Trader Joes; a combination of parboiled long grain brown rice, black barley and daikon radish seeds that give a nice pop when cooked.

Inspired by the shallots and apples at our local farmers market, I'd already made this pilaf several weeks ago and thought it pretty darned tasty. Then I received a gift from my friend Erika and took it a step further, adding walnuts and sweetly tart pomegranate seeds, not only imparting greater depth of flavor but also kicking up the nutrition factor - pomegranates being very high in antioxidants and walnuts giving up a walloping dose of Omega-3 fatty acids.

(Serving suggestion)

Because I avoid eating wheat, I won't be having traditional bread stuffing this Thanksgiving. But I won't feel at all deprived because this delicious, easy-to-make pilaf will be on the table.


Brown Rice Medley Pilaf with Apples, Walnuts & Pomegranate Seeds
Christine's original recipe

Ingredients:
1 and 1/4 cups Brown Rice Medley, or your favorite rice
2 and 1/2 cups chicken stock, organic if store bought but your own home made is best
1 medium sweet onion, finely chopped
2 tart green apples such as Granny Smith, cored, seeded and chopped into 1/2-inch pieces
1 stalk celery, cut in half or quarters lengthwise and cut crosswise into 1/4-inch pieces
2 teaspoons fresh thyme, finely chopped
olive oil and butter for the pan
kosher salt and freshly ground black peppercorns
2/3 cup walnut pieces
1/2 cup pomegranate seeds
Preparation:
Cook the rice in the chicken stock in a rice cooker until done according to the manufacturers directions. The rice will be somewhat moist. Keep warm.
Sauté the onions in about 1 teaspoon each olive oil and unsalted butter until they are golden and soft. Add the apple, celery, and chopped thyme and sauté until they are softly cooked, adding more olive oil and butter if needed to prevent sticking.
Toss the sauté mixture with the rice then season with kosher salt and black pepper to taste. Add the walnuts and pomegranate seeds. Toss until blended.
May be made a day or two ahead, refrigerated.
Reheat, covered, in a 300-degree oven for 30 minutes to serve.

Cook's Notes:
Fresh chopped herbs like sage, marjoram, parsley or celery leaves can be added to the onions, apples and celery as they are sautéing.
Trader Joes did not ask for my endorsement of their product (I just like it) nor have they offered me any promotional renumeration.


Copyright © 2005-2009, Christine Cooks. All rights reserved

Friday, November 13, 2009

Pomegranates and Walnuts, Oh My!


Delivered to my door from the fabulous Sacramento Valley backyard of my bestest friend in the world, Erika. With a little help from her friend Bill, I'll bet.

My heartfelt thanks to you both!

Recipes to follow.....


Copyright © 2005-2009, Christine Cooks. All rights reserved

Sunday, October 25, 2009

Vanilla Yogurt Ice Cream With Sherry-Soaked Bing Cherries

. . . But first:

I could just jump right into the recipe, sidestepping the obvious fact that I haven't been around for, oh, more than a month, giving no explanation for my absence, but you all know I won't be able to leave that alone.

So here's my story. Thus far.

Way back at the beginning of July, I quit eating wheat, along with its related grains (oats, barley, etc.), and cut out all forms of added sugar, including agave and honey. Turns out it wasn't a hardship for me at all. I experienced no sugar withdrawal and no cravings for bread and pasta in the middle of the night. I ate loads of fresh fruits and vegetables along with eggs, small amounts of cheese and even smaller amounts of meat - mostly seafood.

I didn't do this because I wanted to be on a diet. Quite by accident I'd stumbled upon some information about the role that wheat and sugars may play in causing inflammation not only in the bowel, but also in the arteries, brain, heart and joints. (Of course we have the South Beach Diet that combats just those things, but it never really worked for me - I never got over those cravings for what I wasn't allowed to eat - as after Phase 2 I got to add wheat back into my regimen, putting me right back where I started.)

What I read made enough sense to me to give it a try. That was back in July. I had high blood pressure, high cholesterol, and weighed more than I wanted to. Giving my doctor fits as I refused to take statins or blood pressure meds, I kept telling him I could just eat better and exercise more and I would be fine. But my numbers never changed.

Now at least two of them have. Blood pressure is normal, I've lost 20 pounds, twenty! without trying, I actually think with more clarity, and this week I'm finally going to have my cholesterol checked. If that has dropped as well, I will have hit a triple header and will be a very happy, person indeed.

This may be a bit too much sharing for many of you - as in get to the recipe, Christine - but trust me, it had to come out so I can move forward on this business of blogging. I mean, how can I just stop cooking the way I've been cooking without telling you why?

Which brings me back to why I haven't been blogging: The food we've been eating for the past fours months has been fresh, organic, local, all those good things, and . . .

Very Plain.

Very Simple.

Barely blogworthy in my estimation, compared to what I have done in the past.

Recently though I've made a few dishes that have more pizazz, more oompf, and found that they haven't had any adverse affects on me. Of course, I wouldn't pig out on the ice cream I'm about to show you, and, on the whole, I still eat mostly fruits and vegetables, occasionally brown rice or a potato, but I'm finally settling into a comfortable niche and am ready to offer up my repertoire.

If you have an aversion to Splenda, you can always use sugar, but you won't see sugar here. I use so little sweetening for anything these days, preferring the sweet taste that fruits and vegetables can impart, that the amount of Splenda I do use is minimal.

Thank you for indulging me. Now you can have dessert.

There are so many things to like about this recipe: Organic dried Bing cherries; no added sugar, just five small packets of Splenda, allowing the tang of the yogurt to shine through; and possibly best of all, no cooking (no custard making) which allows it to be ready to serve in just a few hours and allows you to adjust for the sweetness at any time.

One more thing: this ice cream is best when served right out of the machine. It can be placed in the freezer, but loses its creamy texture in the process.

Before you begin making the ice cream, you must drain the excess liquid from the yogurt and soak the cherries for several hours. Here's how.
Dampen and wring out a piece of cheesecloth large enough to hang over the sides of a large strainer.
Line the strainer with the cheesecloth and set it over a large measuring cup or bowl.
Spoon the yogurt into the cheesecloth and place the whole thing into the fridge for several hours.
When the liquid has drained from the yogurt, you should have about half the amount of yogurt you started with. Keep cold until ready to use.

Place the dried Bing cherries in a medium bowl and pour the sherry over, stir the cherries a bit to settle the sherry. You want just enough sherry so that the cherries are barely covered.
Let sit at room temperature until most of the sherry has been absorbed and the cherries and plump and very drunk. This took several hours. Strain the remaining very delicious Bing Cherry Sherry into a small glass and save it for making sauces, or give it to your significant other to sip while watching you cook.

Christine's Vanilla Yogurt Ice Cream with Sherry-Soaked Bing Cherries (and you thought we'd never get here)
Ingredients:
2 cups non or low fat plain, organic yogurt, drained of liquid
3/4 cup organic, non-sweetened dried Bing cherries soaked in 1/2 cup dry Sherry
4-5 packets Splenda, adjust to your taste
3/4 cup 1% or 2% milk
3/4 cup cream
1 tablespoon vanilla
Preparation:
Place drained yogurt in a large bowl and stir in Splenda until fully blended.
Stir in the milk, cream and vanilla and mix well.
Adjust for sweetness, remembering that the cherries will impart their own natural sweetness.
Place the mixture into an ice cream maker and process according to the manufacturer's instructions.
When the mixture is softly frozen, slowly drop the strained cherries into the ice cream and finish processing.
Serve directly from the machine, or pack into a container with a tight-fitting lid and put in your freezer for one hour.

Cook's Notes:
I suppose I could have called this Drunken Bing Cherry Yogurt Ice Cream, as the lovely dried Bing cherries are indeed soused by the time it's their turn to be churned, but I think folks might have a hard time doing a Google search for it.
In the interest of explaining what may seem to be a contradicion, remember that banana strawberry galette I made back in August? I didn't eat it, although others did. No, honestly. I didn't.


Copyright © 2005-2009, Christine Cooks. All rights reserved

Tuesday, September 1, 2009

Farmers Market Fruits; Kitchen Counter Still Life with Sunrise


Sunday morning after a Saturday farmers market; early morning sunlight just beginning to come through the kitchen window. How could I not take a photo?

Coming soon . . . A few recipes from over the summer that I somehow didn't find the time to post.

Now I'm going to make the time.


Copyright © 2005-2009, Christine Cooks. All rights reserved

Saturday, August 15, 2009

Strawberry Ice Cream with Balsamic Reduction, Cracked Pepper and a Sprig of Rosemary

All those ingredients and there's no added sugar.

Did you know that we could all use less sugar in our lives? Of course you did.

And did you also know that ice cream doesn't have to be so darn sweet? It's true.

If you make your own ice cream you can play with the ingredients. Just like I've done here. Balsamic vinegar and strawberries go together like milk and cookies. And I love the bite that cracked peppercorns gives to ice cream. The rosemary sprig was a last minute inspiration.

I used all Splenda because I wanted to exclude all sugar except for what occurs naturally in the strawberries and the milk products. And I wanted to see if I could discern that very slight splenda taste that sometimes can be detected in desserts. I think the balsamic reduction worked its magic as I can detect no splenda taste in this ice cream. That said, please use sugar if you wish. The measurement is the same.

And one more thing: If you have very, very sweet strawberries, you can lower the splenda or sugar to as little as 1/4 cup. Try it and see if it doesn't taste wonderfully of strawberries, not sugar, which is the purpose of making your own ice cream, isn't it?


Strawberry Ice Cream with Balsamic Reduction, Cracked Pepper and Rosemary
Christine's original recipe
Ingredients:
4 heaping cups fresh strawberries
4 packets (1 teaspoon) Splenda
4 egg yolks
1/3 cup Splenda granular
2 cups 2% milk
1 cup heavy cream
1/2 teaspoon cracked black peppercorns (See Cook's Notes)
1 tablespoon (more if you wish) balsamic vinegar reduction (See Cook's Notes)
1 4-inch sprig fresh rosemary

Preparation:
Remove the stem ends from the strawberries and cut them into quarters, dropping them into a large bowl as you do so.
Sprinkle the berries with the splenda from packets, toss and let sit for 1/2 hour so the berries can juice up.
Purée the strawberries in a food processor until smooth. It will be thick. Transfer to a large measuring cup (you should have about 3 1/4 cups of purée) and place in the refrigerator to chill.
Heat the milk and the cracked peppercorns to a simmer in a medium saucepan over medium-low; small bubbles will form at the edges. Do not let it boil.
Meanwhile, using an electric mixer, beat the egg yolks and the splenda granular on high until the mixture is pale yellow and thickened.
When the milk is ready, remove it from the heat and pour about 1/3 of it into the egg yolks, whisking constantly so the eggs don't curdle.
Return the milk-egg mixture to the saucepan of milk, whisking to blend.
Place over medium-low heat and stir constantly until it reaches a simmer and the custard coats the back of a wooden spoon. You should be able to make a track through it with your finger. Do not allow this to boil or it will curdle and you will have to begin over again. And that would be a bummer.
Remove the custard from the heat and allow it to cool for 10 minutes.
Pour the custard into a large glass bowl or measuring cup (I have an 8-cup measure that is perfect for this task.)
Whisk in the balsamic reduction and the strawberry puree, whisking until the custard and the strawberries are uniformly blended.
Take the rosemary sprig and swirl it into the custard, leaving it there.
Chill the custard until very cold, overnight is best.
When ready to make ice cream, remove the rosemary sprig, whisk the custard just a bit to re-blend, then process in your machine according to the manufacturer's instructions.


Cook's Notes:
This is excellent served soft right out of the ice cream maker. Or you can pack it in an airtight freezer-proof container and freeze for several hours. Remove it from the freezer at least 15 minutes before you wish to serve it.

Be sure to press a piece of wax paper or plastic wrap onto the ice cream before placing the lid on, as it will keep ice crystals from forming.

I put my peppercorns into a mortar and gently pound them with the pestle until they are coarsely cracked. Using this method, I can control just how coarse or fine I want them to be.

Balsamic reduction, or syrup, is easily made by bringing a cup of good balsamic vinegar to a boil over medium-high heat. When it has reached boiling, turn the heat down to medium and allow the vinegar to simmer until it has reduced by two-thirds. Remove from the heat and allow it to cool for a bit. Refrigerate until ready to use.


Copyright © 2005-2009, Christine Cooks. All rights reserved