Showing posts with label wheat free. Show all posts

Tuesday, August 3, 2010

Gluten-Free Plum Galette with Cardamom, Sugar-Free or Not

I have a new god(dess) and her name is Carol.

A year ago when I went gluten-free, I tried my hand at making GF pancakes, pies, tarts, fruit galettes and more.  Some of them worked fine, others came out so-so and yet others were total disasters.  Mostly I couldn't get away from the "beany" taste and/or gritty texture that the flours I was using imparted, so I just gave it up altogether.

Sometime during the year I realized how much I missed pie crust.  Light, flakey pie crust.  It almost became an obsession.  I grew up on my mother's pies.  She taught me by example how to make flakey, light-as-a-feather crust.  I just had to find a way to make a GF pie or tart that sung to me.

Not too long ago my subscription link to Carol's blog Simply Gluten Free heralded her new GF flour.  A gluten-free flour that Carol guarantees can be used cup for cup like regular flour to make cakes, pies, cookies, breads, pastries, pizza(!), and more.

Was this to be my pie crust salvation?

I ordered some.  As soon as it arrived I made pie dough, rolled it into a large rustic circle and filled it with beautiful fresh plums.  I popped it into the oven.  I waited.  For 50 minutes I waited.  It was agony.

Finally it was time to remove the galette from the oven.  Then it had to cool ...  more agony.

Finally I cut a piece.  I took a bite...


Heaven!  It was heaven.  It had flake.  It had lightness.  It was delicious.

Carol, I bow to you.  You done good!

Gluten-Free Plum Galette with Cardamom
Christine's original recipe inspired by Carol Kacinski's Amazing All-Purpose Gluten Free Flour
(Print recipe)
Ingredients for pie crust:
1 cup gluten-free flour (see link above)
1 packet Splenda or 1 tablespoon sugar
tiny pinch salt
1/3 cup cold unsalted butter, cut into small pieces
2 tablespoons each cold heavy cream and cold water
Preparation:
Whisk together flour, sugar, salt.  Place in food processor and add butter pieces. Using quick pulses, process until butter and flour resemble fine sand, about 5-6 pulses.
Through the feed tube, add the cream in several pours while pulsing and stopping, pulsing and stopping, then add just enough water to make the dough come together. Pinch mixture between your thumb and fingers. If it holds together, it's ready.  Take care to not add too much liquid or your dough will be too wet.
Pour dough onto a sheet of plastic wrap, gather the edges of the wrap and make the dough into a ball.  Flatten the ball into a disc and refrigerate for 45 minutes to 1 hour.
Ingredients for plum filling:
10-12 ripe plums (yellow and red is nice), pits removed, cut into 1/4-inch slices. Makes approx. 3 cups* see Cook's Notes
Splenda packets or sugar to taste** see Cook's Notes
1/2 teaspoon ground cardamom
1 tablespoon tapioca starch
1 tablespoon cold unsalted butter cut into tiny cubes
heavy cream and vanilla sugar to finish the pie crust
Preparation:
While the dough is chilling, combine the plums, sugar, cardamom and tapioca starch in a bowl. Allow to sit at room temperature for 30 minutes for the plum juices to form.
Roll out the pie dough on a pastry cloth sprinkled with gluten free flour to a rough diameter of 14-inches.
Roll the dough up onto your rolling pin and center on a large parchment-lined baking sheet or pizza pan.
Place the plums (juice and all) in the center of the dough, spreading them to within 3-inches of the edges.
Dot the plums with the butter.
Fold the pie dough about 1/2-inch over itself, pleating and pinching if necessary, forming a smooth edge.  Bring the smooth edges of the dough about 3-inches over the plums, pleating as you go around, leaving a good portion of the plums showing in the middle of the galette.
Brush the dough with heavy cream and sprinkle with vanilla sugar. This is optional but makes for a nice crust.
Bake in a 380-degree oven for 45-50 minutes or until the crust is golden and the filling is bubbly.
Cool 30 minutes before cutting.
Eat and enjoy!  Then just think of the possibilities...


* I actually used 20 plums (10 red and 10 yellow) which made a total of 5 cups. I saved 2 cups of the mixture to make ice cream. Which will be coming along soon. ;)

** I have not provided a measurement for the Splenda or sugar because the amount you use will depend on how tart or sweet your plums are.  Add it sparingly and taste until it is to your satisfaction.  The plums I used were fairly tart so I added 7 packets of Splenda, which amounts to approx. 6 tablespoons of sugar, which is just under 1/2 cup. The finished fruit was tart with a sweet finish.

One more thing:  Just to keep the record straight, Carol doesn't know that I'm writing this post.  Well ...  she does now, now that I've published.  But there is no collusion here.  She didn't ask me to write this and I received no freebies for doing so. I'm just terrifically excited by the GF flour.


Copyright © 2005-2010, Christine Cooks. All rights reserved

Friday, April 2, 2010

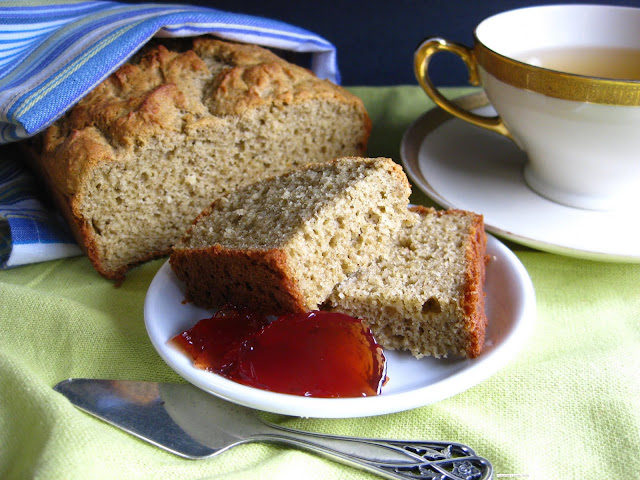
Gluten Free, Sugar Free Buttermilk Tea Bread

I cannot take the credit for this luscious gluten free tea bread.  That would go to Britt of GF in the City.

Yep. I took her recipe, left out the bananas, made a few other changes, and offer it to you here - with no credit to myself.

I've said before that I didn't inherit the baking genes in my family.  Those belong mostly to my sister Di, with sister Cyn running a close second.  So when I want to bake, unless it's a dirt simple recipe like this, I go recipe hunting.

For anyone who eats gluten free and occasionally gets cravings for a nice slice of moist, slightly sweet bread with their afternoon tea, this is the loaf to make.  It's easy to whip up and may be stored in the fridge for a week or so, or in the freezer for several months.  What are you waiting for?

Gluten Free, Sugar Free Buttermilk Tea Bread
Recipe adapted from GF in the City
(print recipe)
Ingredients:
1 cup sweet white sorghum flour
1/2 cup finely ground almonds, or almond flour
1/4 cup potato starch
1/2 teaspoon xanthan gum
2 teaspoons baking powder
1/2 teaspoon baking soda
1/2 teaspoon salt
1/3 cup unsalted butter, room temperature
12 packets Splenda or 1/2 cup sugar if preferred
2 eggs
3/4 cup buttermilk
Preparation:
In the bowl of an electric mixer, cream the butter and Splenda until smooth and creamy.  Add the eggs, one at a time and beat well.
In a separate bowl, combine all the dry ingredients, stirring with a whisk to incorporate.
Adding the dry ingredients first and last, alternate dry with the buttermilk until all of it has been used.  Beat thoroughly.
Put batter into a large loaf pan that has been sprayed with a non-stick spray and bake at 350-degrees for about 45 minutes.  When the bread is done, the top will be golden and crusty and a toothpick inserted into the loaf will come out clean.
Allow the loaf to rest in the pan for about 5 minutes then turn onto a rack to finish cooling.

This bread holds its own in a toaster so if you're toast-deprived like I am, give it a try.

Happy cooking!


Copyright © 2005-2010, Christine Cooks. All rights reserved

Wednesday, January 6, 2010

Buckwheat Crêpes with Chestnut Spread Filling Plus Gifts From Paris

I'd been waiting for oh so long, never giving up hope, checking the post office every day, when finally it arrived.

That old adage, good things come to those who wait, was never more true: The moment I tore into the package and saw what Emily of Tomato Kumato had sent me, I couldn't have been more delighted. How did she know just what to send me? Clever girl!

I knew right away just how I would use the Bonne Mamman Chestnut Spread, which you will see in a minute. The Fleur de Sel is one of my favorites and I was just about to use up the last of mine when this arrived. Great timing, Emily.

Season's Eatings is Katie's (Thyme for Cooking) holiday gift exchange event that pairs bloggers from all over the world and challenges them to send a gift specific to their region to the person they've been paired with. I'm glad I participated this year and plan to do it again next time the holidays roll around. Click on this link to see Katie's roundup. Be sure to come back for breakfast . . .


After going wheat-free last summer, pancakes and waffles were off my list of things to eat, leaving me feeling a bit deprived from time to time. So for some while now I've been working on perfecting a buckwheat crêpe which finally came together a few days before my Paris package arrived. (Showing again what perfect timing Emily has.) This is going to be my go-to recipe when a craving for pancakes gets to be more than I can resist.

These crêpes are light, airy, moist, slightly nutty in flavor, a little sweet, and utterly delicious and satisfying. You don't have to stuff them with chestnut spread as I did for my sons and daughters-in-law last weekend; they are perfectly wonderful on their own or with blueberry preserves on the inside and a bit of cinnamon on the outside.
But . . . If you can get your hands on a jar of this stuff with the cute brown gingham lid, go for it. It's fabulous. A bit sweet. Fruit butter smooth with a slightly grainy tooth at the same time. Perfumed with vanilla. Holy cow! I took one bite and thought, OK, yeah there's sugar in here and I'm just going to live with it for a day.

Buckwheat Crêpes with Chestnut Spread Filling
Christine's original recipe
(print recipe)
Makes 6-8 crêpes - recipe may be doubled
Ingredients:1/2 cup organic buckwheat flour (see Cook's Notes)
1/4 cup organic brown rice flour
1 tablespoon organic tapioca starch
1/2 teaspoon baking powder
1/4 teaspoon fine kosher salt
3 packets Splenda (equals approx. 2 tablespoons sugar in sweetness)
1 egg lightly beaten
2/3 cup 2% milk
1/3 cup water
1 teaspoon good vanilla extract
Unsalted butter for the pan
Preparation:
Sift together all the dry ingredients into a large bowl.
Whisk together the wet ingredients until fully blended.
Make a well in the center of the flour mixture and pour the liquid mixture into it.
Using a fork, stir until all the flour is mixed with the liquid. The batter could have lumps in it, and that's fine. The batter will be watery.
Melt 1/8 to 1/4 teaspoon butter in a 5 to 6-inch pan over medium-low heat, spreading the melted butter to cover the bottom of the pan.


Drop 1/4 cup batter into the center of the pan. It should spread to the edges. If it doesn't, next time use 1/3 cup batter for each crêpe.
Cook until bubbles form on the top of the crêpe, steam begins to form, and the bottom is just turning brown.
Using a wide spatula, flip the crêpe and cook an additional 30 seconds on the other side.
Stack the finished crêpes on a plate and keep them warm, covered with a kitchen towel, until all the crêpes are done.
Spoon Bonne Mamman Chestnut Spread or your favorite filling along one side of a crêpe and roll it up, cigar style. Repeat with the remaining crêpes.
Sprinkle with cinnamon or drizzle with your favorite syrup.


Cook's Notes
For those who are interested, buckwheat is not a grain. It's a fruit seed, related to the rhubarb family, and it's entirely gluten-free. Studies using buckwheat have shown a number of health benefits in humans, which you can read about on the World's Healthiest Foods site.
I would be remiss if I did not brag about our local farmer, Kevin Cunningham, who raises barley, oats, buckwheat and other grains at Shakefork Community Farm, turns them into stoneground flours and sells them to us lucky folks at the farmers market. And although I avoid the grains these days, I'll be stocking up on the buckwheat groats and flour whenever they are available.


Copyright © 2005-2009, Christine Cooks. All rights reserved

Tuesday, December 22, 2009

A Recipe For Sugar Free, Wheat Free Cocoa Dusted Coconut Macaroons

That mouthful of a title can't hold a candle to what this mouthful of a morsel will do to your tastebuds. Moist, dense but delicate is how I would describe these seasonal, coconut-filled treats. And very satisfying to one who is eschewing all added sugars and sometimes feeling the pain of it all.

After sampling a macaroon recently that had been made with sweetened condensed milk, I (and my now sugar-free sweet tooth) were determined to develop a no-sugar version. Searching through a few recipes and discovering that flour is added to many iterations of coconut macaroons, I (and my newly wheat-free shadow) just winged it and came up with this very simple, surprisingly moist rendition.

Made mostly from unsweetened, shredded coconut, this will nonetheless delight any sweet lover's tooth. If you aren't a Splenda user, you could use sugar instead - about 2 tablespoons, or to your taste.

Sift a little unsweetened cocoa powder over half of the finished cookies to dress them up a bit and satisfy the chocolate lover within.

Sugar Free Coconut Macaroons (Cocoa dusting optional)
Christine's original recipe
(print recipe)
Ingredients:
2 cups finely shreded, organic unsweetened coconut
2 tablespoons organic tapioca starch
5 packets Splenda (or 2 tablespoons sugar)
few grains of kosher salt
1/2 teaspoon (scant) baking powder, aluminum and gluten free
2 ounces fresh evaporated milk (not sweetened condensed)
Preparation:
Combine all the dry ingredients and, using your clean fingers and a whisk, stir to thoroughly combine.
Using a fork, stir the dry mixture while adding the evaporated milk, one teaspoon at a time, until the mixture holds its shape when squeezed between your fingers.
Scoop 1 tablespoon into the palm of your hand and compact into a ball, shaping it with your fingers.
Place the balls 1-inch apart on a parchment lined baking sheet and bake in a 300-degree oven for 18 to 20 minutes, or until they just begin to show color. Don't overbake.
Remove the macaroons with the parchment paper to a rack and allow them to cool completely.
When cooled, dust some or all of them with cocoa powder by placing a tablespoon or so of good organic dark cocoa powder into a fine sieve and gently tapping the edge of the sieve to release the cocoa.
Store the sweets in an airtight container. They will retain their moisture and structure for at least 4 days. They are, however, 4 days old as I write this and still holding their own so I will venture to guess that those 4 days could stretch into a week. Ed. note - after 4 days they began drying out a bit, so I would say they will save in an airtight container for up to 4 days.

Enjoy!


Copyright © 2005-2009, Christine Cooks. All rights reserved

Monday, November 30, 2009

Christine's Recipe for Potato Leek Soup with Uncured Ham, Marjoram and Thyme

When I stopped eating wheat, I lived mostly on vegetables, leafy greens, eggs and fruit, with the occasional piece of fish or shellfish thrown in for protein. A good four months went by before I ventured into trying wheat-free substitutions such as rice and potatoes.

I found that I can eat potatoes with no marked change in weight (leave out the butter and sour cream!). Nor did I experience that heavy, bloated feeling that comes with eating wheat.

And although I don't eat them regularly, I don't fear them like I used to - all that high-glycemic starch - and have found out that they are a nutritious, high antioxidant (red and purple ones especially) addition to a wheat-free diet.

So in celebration of the potato, I offer a hearty, warming soup that is so easy to make you practically can do it blindfolded, although I would not suggest you do so unless your knife skills are at Samurai level.

One hour, from start to finish, this soup was the perfect main course for a chilly night, watching a wonderful old movie with our friends Robert and Simona.

Popcorn was the first course, but that's for another post...


Potato Leek Soup with Uncured Ham, Marjoram and Thyme
Christine's original recipe
Ingredients:
6 cups quartered small potatoes (a mix of red and yellow work well)
6 cups chopped leeks, white and pale green parts only
4-5 long stems fresh marjoram
3-4 stems fresh thyme
6 cups chicken stock, preferrably home made (use low sodium if store bought)
1 heaping cup cubed applewood smoked, fully cooked, Niman Ranch uncured ham (optional, but really good)
Kosher salt and freshly ground black pepper
small amount of olive oil for the pan
1/2 cup dry white wine
Preparation:
Add the chicken stock to a large soup pot and heat over medium flame.
Add the potatoes, bring to just under a boil then lower the heat to a simmer.
Toss the herbs, stems and all, into the soup pot and push them into the stock with a spoon.

Meanwhile, sauté the leeks in olive oil over medium heat in a large, heavy skillet (I use cast iron), tossing with tongs to keep them from burning, until they are softly cooked and slightly caramelized, about 8 minutes.
Scrape the leeks into the soup pot and return the skillet to the flame.
Deglaze the skillet with the white wine, scraping up any browned bits, then pour it all into the soup pot.
Simmer the soup, partially covered, until the potatoes are tender and the herby smells fill your kitchen, bringing hungry folks in to see what's cooking.
When the soup is done, remove the herbs with tongs and strip the leaves from the stems, tossing the leaves back into the pot. This is a rather messy job, but worth it in the end.
Remove the pot from the heat and, using a potato masher, mash the contents until they thicken the stock but still retain some shape.
Put the soup over low heat, toss in the ham cubes to warm.
Serve and enjoy.


Copyright © 2005-2009, Christine Cooks. All rights reserved

Monday, November 23, 2009

How to Peel and Purée Chestnuts Plus Christine's Recipe for Sugar-Free Fresh Chestnut Ice Cream with Armagnac

I eagerly await the arrival each fall at the farmers market of McIntosh Farms' Willow Creek grown chestnuts. Fresh-picked from trees just 25 miles (as the crow flies) from my kitchen, they are displayed in a line of deep cardboard boxes, the scent of roasting chestnuts wafting from the Weber kettle situated at one end, enticing customers to come take a look.

In previous years, I've snipped the ends of the nuts in an X, then roasted them in a chestnut pan. Sometimes the peeling was easy, sometimes not. The not part can be very frustrating so this year, in the interest of searching for an easier peeling process, I decided to try another method - boiling.

While this method is not nearly as romantic as chestnuts roasting on a open fire, boiling chestnuts makes them way easier to peel, in my experience. An added bonus being that the nut meat tastes sweeter.

And that sweetness fairly screams ice cream.
Certainly not the prettiest starlet in the lineup, with her rather beige coloring, nonetheless this ice cream imparts a mysteriously sweet-nutty taste and mouth feel, followed by a smokey Armagnac undertone; a perfect finish to an evening meal with friends and family on a fall-into-winter's night, and not at all a bad idea to compliment the end of a Thanksgiving dinner, if you'll excuse my pumpkin pie blasphemy.
The combination of chestnuts and Armagnac came to me as I was musing about how to prepare the purée for ice cream. Adding water or just cream seemed too blah.

Well, chestnuts remind me of the south-west of France and the south-west of France reminds me of Armagnac. So there you have it. Divine provenance.

Instructions for Peeling and Puréeing Chestnuts
I began with 13-ounces by weight of fresh chestnuts.
To prepare the chestnuts for peeling, snip an X into the flat base of each nut and put them into a saucepan. Fill with water to cover by one to two inches.
Bring to a boil and continuing boiling for 3 to 4 minutes. Turn off the heat, leaving the chestnuts in the hot water.
I used surgical gloves (available at Costco) for the next step.
Retrieving a nut from the saucepan with a pair of tongs, and using a sharp knife, peel the shells and skin from each chestnut, dropping the naked nut into a bowl. Repeat until all the chestnuts are peeled. If peeling becomes difficult, reheat the water briefly to warm up the skins and continue peeling.
When you are finished, you should have about 2 cups of peeled chestnuts.

Now comes the fun part:
Place the chestnuts in a food processor and pulse a few times to break up the nuts.
While continuing to pulse, add 3 tablespoons heavy cream and 2-3 tablespoons Armagnac through the feed tube puréeing until finely ground. The puree will be moist and hold together when pinched between your fingers. It should not be wet or gooey.
Yields about 2 and 1/2 cups of purée.
Use 1 and 1/2 cups for the ice cream and put the rest into a lidded glass jar and refrigerate until inspiration strikes you.
If it strikes me, I'll let you know.
I'm already thinking about stuffing dates.
And I like Simona's suggestion to make a wheatless pie crust.
All in good time, Grasshopper.

Sugar-Free Chestnut Ice Cream with Armagnac
Christine's original recipe
Ingredients:
1 and 1/2 cups chestnut purée
6 medium egg yolks (4 if large)
8 packets Splenda, divided (see Cook's Notes)

2 cups 2% milk
1 and 1/2 cups heavy cream
Preparation:
Heat the milk and cream in a heavy saucepan just until small bubbles form around the edge of the pan. Remove from the heat, set aside.
Beat the egg yolks with 2 packets of Splenda until the yolks are thick and pale yellow. Set aside. (I will tell you here that my eggs come from my backyard chickens and the yolks are a deep orange. They never become pale yellow no matter how long I beat them.)
Pour the milk-cream mixture into a food processor, add the chestnut purée and 4 packets Splenda and process until creamy smooth. Place all but 1 cup of the milk-chestnut mixture into a medium saucepan and set over low heat
Whisk the remaining cup of milk-chestnut purée into the eggs then pour it into the saucepan, whisking constantly.
Heat gently until the mixture coats the back of a wooden spoon. Do not allow to boil or it will curdle.
Taste and adjust for sweetness, keeping in mind that the freezing process diminishes sweet on the tongue. At this point I added 2 more packets of Splenda for a total of eight.
Remove from the heat and let cool for about 15 minutes.
Pour into a large glass measuring cup or pitcher and refrigerate for at least 12 hours.
When ready to process, gently whisk the mixture (see Cook's Notes about straining), pour into the ice cream machine and process according to the manufacturer's instructions.
May be served directly from the ice cream maker, or packed into sealed containers and frozen for several hours.

Cook's Notes:
If you don't have access to fresh chestnuts, you could use jarred whole chestnuts and proceed from there.

I no longer add any kind of sugar to my recipes, relying mostly on the natural sweetness of fresh fruits and vegetables.When I want a sweeter dessert however, I use Splenda packets because they are sweeter than the granular Splenda, the product is not bulky nor does it impart a chemical taste, and I can control the amount of sweetness. One packet contains 1/4 teaspoon of Splenda and is equal to about 2 teaspoons of sugar in sweetness. So, 8 packets of Splenda will yield about 2 teaspoons which will equal approx 16 teaspoons or 5 and 1/3 tablespoons of sugar. If you want to use sugar in this recipe instead of Splenda, take notes because I doubt I'll repeat that again.

To strain or not to strain - that is the question. I didn't strain the mixture prior to pouring it into the ice cream machine because my tongue likes playing with its food. That said, Mr CC, who liked this ice cream very much, warned me that some people would like it and others would not and that it might depend entirely on the texture. If you have eaters who like their ice cream purely creamy and devoid of interesting content with which a curious tongue can play, by all means strain the mixture just before pouring it into the machine. It will still taste good, though not as interesting - in my humble opinion.


Copyright © 2005-2009, Christine Cooks. All rights reserved

Tuesday, November 17, 2009

Christine's Recipe For Brown Rice Medley Pilaf With Apples, Walnuts and Pomegranate Seeds

I love the Brown Rice Medley from Trader Joes; a combination of parboiled long grain brown rice, black barley and daikon radish seeds that give a nice pop when cooked.

Inspired by the shallots and apples at our local farmers market, I'd already made this pilaf several weeks ago and thought it pretty darned tasty. Then I received a gift from my friend Erika and took it a step further, adding walnuts and sweetly tart pomegranate seeds, not only imparting greater depth of flavor but also kicking up the nutrition factor - pomegranates being very high in antioxidants and walnuts giving up a walloping dose of Omega-3 fatty acids.

(Serving suggestion)

Because I avoid eating wheat, I won't be having traditional bread stuffing this Thanksgiving. But I won't feel at all deprived because this delicious, easy-to-make pilaf will be on the table.


Brown Rice Medley Pilaf with Apples, Walnuts & Pomegranate Seeds
Christine's original recipe

Ingredients:
1 and 1/4 cups Brown Rice Medley, or your favorite rice
2 and 1/2 cups chicken stock, organic if store bought but your own home made is best
1 medium sweet onion, finely chopped
2 tart green apples such as Granny Smith, cored, seeded and chopped into 1/2-inch pieces
1 stalk celery, cut in half or quarters lengthwise and cut crosswise into 1/4-inch pieces
2 teaspoons fresh thyme, finely chopped
olive oil and butter for the pan
kosher salt and freshly ground black peppercorns
2/3 cup walnut pieces
1/2 cup pomegranate seeds
Preparation:
Cook the rice in the chicken stock in a rice cooker until done according to the manufacturers directions. The rice will be somewhat moist. Keep warm.
Sauté the onions in about 1 teaspoon each olive oil and unsalted butter until they are golden and soft. Add the apple, celery, and chopped thyme and sauté until they are softly cooked, adding more olive oil and butter if needed to prevent sticking.
Toss the sauté mixture with the rice then season with kosher salt and black pepper to taste. Add the walnuts and pomegranate seeds. Toss until blended.
May be made a day or two ahead, refrigerated.
Reheat, covered, in a 300-degree oven for 30 minutes to serve.

Cook's Notes:
Fresh chopped herbs like sage, marjoram, parsley or celery leaves can be added to the onions, apples and celery as they are sautéing.
Trader Joes did not ask for my endorsement of their product (I just like it) nor have they offered me any promotional renumeration.


Copyright © 2005-2009, Christine Cooks. All rights reserved