Showing posts with label braising. Show all posts

Friday, March 1, 2019

Braised Chicken Thighs with Lemon, Garlic, and Olives


Update 3-1-19:  Well, I don't know where my head was when I wrote this post but clearly I let it fall through some crack or another. When I think about it, if I think about it, I have to admit my love of blogging has taken a left turn and my not return at all.  At any rate, it would be a waste of a good recipe if I didn't post this one, it's that good and that easy.  Read on for a glimpse into my psyche in 2016.

I had thought I was finished with this blog, posting here and there over the last few years with lots of time and space in between, then falling off to one or two posts a year in a feeble attempt to keep it going.

My life changed drastically over the fall of 2012 and the beginning of 2013 and the joy I took in creating recipes and cooking to post on this blog fell to zero.

Here it is, 3 years later (now 6), and the urge to share is returning to me.  I don't promise recipes every day, or even every week, in fact I don't make promises anymore at all.  But I still do cook, and Mr. CC keeps telling me to "write it down, Sweetie."

So now I begin again.  And where better than with a dish fit for Autumn: A simple, put-it-in-the-oven-and-walk-away recipe that befits the shorter days and crispy-cool nights that promise more warm and inviting dishes from the oven.

Braised Chicken Thighs with Lemon, Garlic, and Olives
Recipe by Christine
Serves 4 to 8 people
Ingredients:
8 skin on, bone in chicken thighs
2 teaspoons vegetable oil, such as canola
2 whole lemons (I use Meyers when I can get them)
12 cloves garlic
3/4 cup mixed olives with pits
1 tablespoon Penzey's Tuscan Sunset herb mix
1-2 cups low sodium chicken stock or a combo of stock and dry white wine
Kosher salt and fresh ground pepper to taste
Preparation:
Heat oven to 370-degrees F.
Drizzle oil in a Dutch oven or other oven-safe lidded casserole and wipe the bottom and sides with a paper towel (I used a Staub Cocotte, which I happen be lucky enough to own, but any cast iron Dutch oven works just as well).
Season chicken thighs with salt and pepper to your liking and arrange on the bottom of the pot.
Peel the garlic cloves and slice in halves or thirds, depending on the size of the cloves, and push between the chicken thighs.
Cut the lemons into quarters (or eighths, depending on size) lengthwise, then cut off the stem end and slice off the center of each wedge to release the seeds.  Remove the seeds and push the wedges between the chicken thighs.
Sprinkle the olives over the top of the chicken, then sprinkle the herb mix over all.
Pour 1 cup of the chicken stock over the chicken until it barely covers.
Cover with a lid and place in the oven on a centered rack, and braise for about 2 hours, removing the lid for the last 20 minutes.  Check after an hour or so and add more chicken stock if needed.
When the thighs are falling off the bone, take the pot out of the oven and let it rest for at least 15 minutes and up to 1/2 hour.

You can pair this dish with cooked rice, polenta, or simply good sour dough bread to sop up the juices.


Copyright 2005-2019, Christine Cooks. All rights reserved

Monday, July 9, 2012

Slow Cooker Braised Pork Belly


 Ok. I've never cooked pork belly before.  Mr CC has had it in restaurants and has pretty much swooned over it.  Me? Way too much fat to ingest.  It was never on the list of foods I simply must prepare.


Until I saw a large slab of it at my most favorite local co-op.  Look at that meat to fat ratio, people!  The clincher was it's local, organic, pasture-raised pork and I wasn't going to take a pass on that.

All I know about pork belly is this:  It usually has a very high fat to meat ratio; has become de rigueur in many fine restaurants; bacon resides therein.

That's it.


Here's what I observe about pork belly:  The fat is mostly around the meat, not really in the meat.

Deduction:  Braising must happen.

So I went merrily on my way, winging this recipe.  I must tell you now that today I actually looked up the methods used to braise pork belly and almost all of them instruct to cover the meat in a liquid. Hmmm...

Didn't do that.  I thought with so much fat around the meat the slow cooker would render it into liquid and the liquid fat, along with the aromatics, would make the pork tender.

I got most of that right, but you know what they say about horseshoes...  Turns out that after 4 hours the pork was actually cooked through but really tough, the liquid covering only about half of it.

That's when I punted, set the slow cooker on Low for 8 more hours (12 total) and every few hours turned the belly over and occasionally basted the top with the juices.  After 12 hours it was pull-apart tender yet still slice-able, and very, very tasty.


Now let me tell you about the liquid:  It's good. It's Really good.  A combination of rendered fat, juices from the meat, the spice berries, bay leaves and gin.  I have no idea what inspired me to use that combination of  aromatics, they just sounded good. When I got to the juniper berries is when I jumped to gin; seemed like a good idea and I'm happy with it.  Mr CC is too.  Use a good gin for this: not too dry, not too floral.

The fat?  As I said, the meat to fat ratio in this particular belly was high on the meaty side.  Also, I'm not so worried about a moderate amount of animal fat when I know the source and this comes from an organic, sustainable farm about 60 miles from my kitchen, Alexandre Farm.  If you're going to eat meat, you should know whence it hails.


Slow Cooker Braised Pork Belly
Christine's original recipe
Print
Ingredients:
3 pounds lean pork belly
8 allspice berries
8 juniper berries
3 fresh bay leaves, crushed
Generous amounts of kosher salt and fresh cracked black pepper
1/4 cup good gin (could use more)

Preparation:

  • If silver skin is present, remove as much as you have the patience for, using a sharp boning knife.
  • Season the meat all over with the kosher salt and cracked black pepper then place in the bottom of a slow cooker large enough to hold the meat without touching the sides too much.  I put the fattier side down first then turned it over later.
  • Sprinkle the spice berries over the meat and put the crushed bay leaves around the edges.
  • Pour the gin around the sides of the meat so it gets underneath.
  • Turn the slow cooker on low for 10 - 12 hours and walk away, returning occasionally to turn the meat and baste it.
  • When the meat is fall-apart tender, remove from the crock pot and allow it to rest for a bit before serving.


Serving suggestions:
Thinly sliced over a salad of garden greens.  Use some of the juices to make a vinaigrette.
Dice small, sear briefly in a hot pan, sprinkle on scrambled eggs.
Warm, thick slices over green lentils (leave out the duck). (You may want to prepare this when most of the US is not experiencing the heat of this particular summer.)
Place warm slices with juices on a sturdy grilled bun, top with favorite condiments, garden lettuce, sliced tomato.

More notes:
Store the pork belly in its juices in a covered container. Refrigerate.


Copyright © 2005-2012, Christine Cooks. All rights reserved

Friday, May 11, 2012

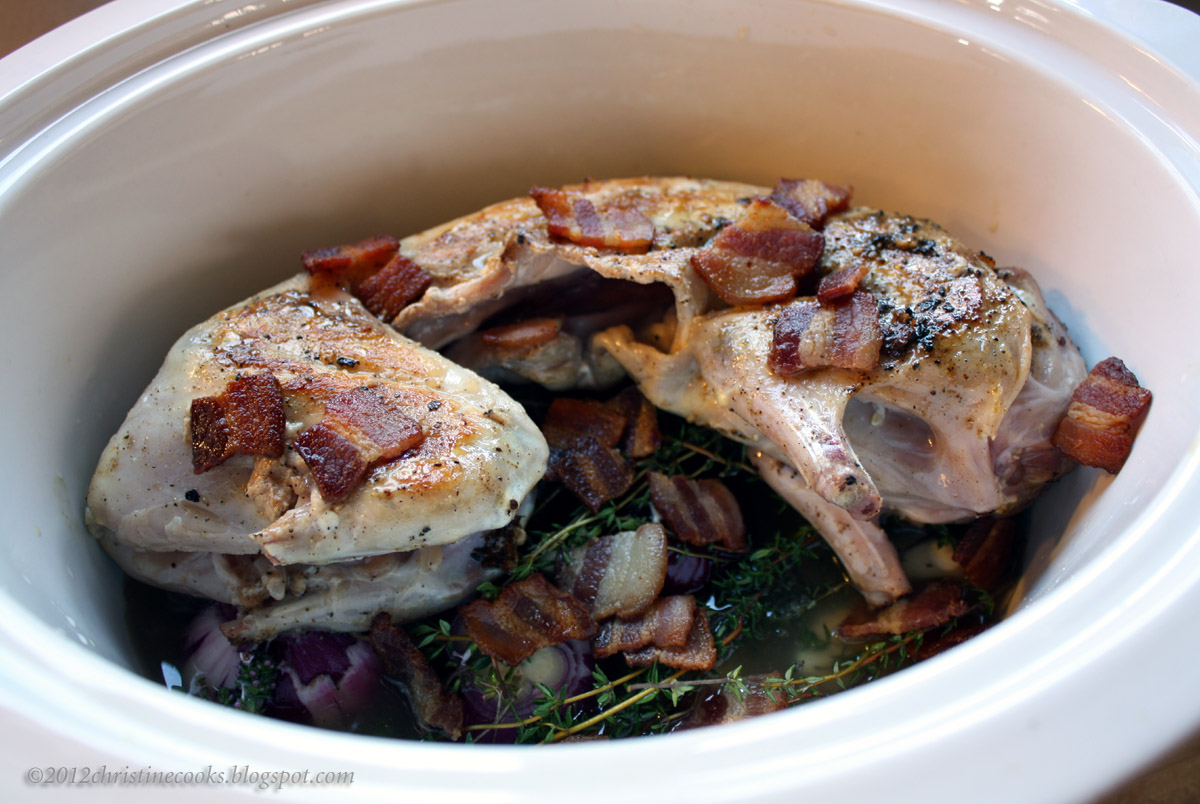
Slow Cooker Braised Rabbit with Garlic, Cippolini Onions & Thyme


I am not feeling well.  Haven't been for almost a month.  That nasty cold/flu thingy knocked me flat.  A few days ago I began to recover; almost felt like myself again.  Went back to work, saw a few plays in Ashland.  Felt not perfectly fine, but at least better.  Then the headaches began, temperature spiked, felt hot, clammy, chilled all in the same minute.  Went to the doc and whaddaya know?  I have a sinus infection.  Arrrg.  Back to laying around, trying to rest, trying to get better.
Soooo boring.

Why am I sharing this?  Two reasons:  1) If you get, or have, that nasty cold/flu thingy?, take good care of yourself. Get plenty of rest and do not jump up and do the samba just because you think you are better. It's a nasty, nasty virus that will knock you down again if you get too cocky;  2) The dish you see above is directly related to how much effort I was willing to put into dinner.  For all that, I was able to use ingredients I already had in the house and garden, it required very little prep time, and turned out to have the taste and comfort level my weary self was craving.  The look of the finished dish isn't going to win any awards, I know that, but comfort level?  A winner for sure.


So here's what you do (and in the Cook's Notes I'll tell you what I would do differently next time):
Pull a rabbit out of your hat freezer and defrost it overnight in the fridge.  If you don't have a rabbit, use a chicken.
Peel six red cippolini onions and twelve or more cloves of garlic.  Leave them whole.  Get out some whole peppercorns (Tellicherry are my favorite), some flakey sea salt, a couple of bay leaves (fresh if you can get them; I happen to have a bay tree growing just outside my door) and a handful of fresh thyme sprigs.  If you have some bacon hanging around, already cut into large-ish dice and already cooked (because Mr CC has been cooking for me and he loves bacon), use about a half cup of that.  (If you are feeling well enough to go to the store, buy some good smokey bacon, cut it into large-ish dice - about 3/4-inch square -  and cook it.)
You will need some dry white wine (I used a Sauvignon Blanc) and some homemade or low-sodium store-bought chicken stock.
And that's it.


In the slow cooker, lay down the whole onions, garlic cloves and peppercorns first then place 1/2 of the thyme sprigs over them, then 1/2 of the bacon pieces.


Sprinkle the rabbit all over with sea salt and fresh-ground black pepper to your liking.
Quickly sear the rabbit in a hot skillet, in a slick of bacon fat if you have it, if not, olive oil with a small amount of butter is fine, until lightly browned all over, then place the rabbit over the aromatics in the slow cooker.  Using 1/2 of the white wine, deglaze the skillet, scraping loose the browned bits from the bottom and pour that over the rabbit.
Sprinkle the remainder of the bacon pieces and the remainder of the thyme sprigs on top of the rabbit.
Gently pour in the rest of the white wine and the chicken stock.
Set the slow cooker to high for the first 4 hours, then low for the next 4-6 hours, depending on how long it takes your slow cooker to render the rabbit fall-off-the-bone-tender.
Go back to bed and wait rest.
After 4 hours the scent wafting through the kitchen will drive you crazy, but you must wait until tenderness is achieved.
Sleep a little, it'll help.

Slow Cooker Braised Rabbit with Garlic, Cippolini Onions and Thyme
Christine's Original Recipe
Ingredients:
1 whole rabbit, skinned (a chicken may be substituted)
12 cloves garlic, peeled and left whole
6 cippolini onions (red or yellow), peeled and left whole
10-12 sprigs fresh thyme
2 bays leaves, fresh if you have them, dry are ok
1/2 cup cooked bacon pieces in approx. 3/4-inch dice
5-6 whole peppercorns
sea salt and freshly-ground black pepper to taste
1 and 1/2 cups dry white wine, divided
1 cup low-sodium stock (preferrably home made)
Preparation:
Place the onions, garlic and peppercorns in the bottom of a slow cooker. Sprinkle with 1/2 of the bacon and 1/2 of the thyme sprigs.
Sear the rabbit in a skillet over high heat in a small amount of fat (bacon fat, duck fat, olive oil, butter - your choice) until golden brown.  Adjust heat so rabbit doesn't burn.
Place the seared rabbit over the aromatics in the slow cooker.
Pour 1/2 of the white wine into the hot skillet and scrape up the browned bits from the bottom, allowing the wine to reduce by half.  Pour this over the rabbit.
Sprinkle the remaining bacon pieces over the rabbit followed by the remaining sprigs of thyme.
Pour the chicken stock and remainder of the white wine into the slow cooker, put the lid on and set the cooker to High for the first 4 hours, then to Low for 4-6 hours thereafter.
If necessary, it's okay to turn the rabbit over once or twice during cooking.
When the rabbit is tender, turn the slow cooker off or set it on Hold.  Using tongs, remove all the thyme stems.
Transfer the rabbit to a warmed plate and divide into individual portions.  Spoons the onions, garlic and juices over and around the rabbit and bring it to the table.

Cook's Notes:
Had I been feeling better, I'd have cut the rabbit into serving pieces before searing and cooking. I think it would be much more manageable that way.  That said, this wasn't all that unmanageable.
Watch out for bones:  this isn't chicken (or maybe you used a chicken?), rabbit bones are tiny. 


Copyright © 2005-2012, Christine Cooks. All rights reserved

Monday, March 3, 2008

Braised Lamb Shanks


At one point during my recent bout with the flu, I was so hungry after not being able to eat for far too many days that I pulled myself out of bed and pulled some lamb shanks out of the freezer.

A day or so later, after recovering from the above output of energy, I put this dish together using what was available in the pantry. No way was I going to the market.

Now I'm not saying that braised lamb shanks are good for what ails you. Certainly it's a rather heavy dish when one is trying to recover from illness. But I'd lost 6 pounds while not being able to eat and I was ravenous so I made them anyway. Plus the leftovers could see us through another few days. Thinking ahead.

Braised Lamb Shanks
Christine's original recipe
Ingredients:
4 medium lamb shanks, trimmed of fat

1 large sweet onion, peeled, halved and sliced thin
2 large carrots, peeled and sliced in about 1/4-inch pieces
14 cloves fresh garlic, peeled, left whole
3 long sprigs fresh rosemary, stripped and coarsely chopped
1 28-ounce can Muir Glen Fire Roasted Crushed Tomatoes
14-ounces each, chicken broth and beef broth
1 bottle red wine (I used a Domaine de Fontsainte, Corbière 2003, but either a
Malbec or a Syrah would go nicely)
Olive oil for the pan
Salt and pepper to taste

Preparation:
Pre-heat the oven to 350-degrees.
Heat a large cast iron pan over high heat then add about a tablespoon of olive oil.
Turn the heat to medium high and brown the shanks on all sides, seasoning with salt and pepper as you go. Remove the browned shanks to a plate and keep warm.
Sauté the onions and carrots until the onions are softened.
Add the peeled garlic cloves and the chopped rosemary and sauté 1 minute more.
Add the tomatoes, stocks and wine to the skillet and give it a stir. Put the lamb shanks back in the skillet with whatever juices accumulated on the plate. Turn the shanks over in the sauce until they are coated on all sides.
Cover the skillet and put it in the oven for 1 1/2 to 2 hours or until the lamb is falling-off-the-bone tender.
Remove the lid during the last 1/2 hour of braising so the liquid can thicken.
Sop up the wonderful liquid with a crusty, chewy artisan bread that you've slathered with the braised garlic cloves. Then go back to bed.


Copyright © 2005-2008, Christine Cooks. All rights reserved