I prepared a dish the other night that was so simple, so plebeian really, that I hardly consider it blog worthy. But Clay says, "Write it down, Sweetie!" What can I say? After 23 years he's still my biggest fan. This is definitely a week-night, put-something-on-the-table-cuz-we're-hungry-and-it's-getting-late kind of meal.
Fillet of Sole with White Beans and Tomatoes
8 - 10 sole fillets, or other thinly filleted white fish
1 can small white beans - can be seasoned lightly
1 can Cannelini (large white beans)
2 cans ready-cut tomatoes (if seasoned, use the Italian)
1 ear fresh corn - kernels sliced from cob
2 tablespoons fresh basil, finely sliced
white wine
Combine 1 can of ready-cut tomatoes, drained, with the can of small white beans, also drained, and the corn kernels. Gently toss with 1 tablespoon of basil.
Spread the other can of tomatoes and the cannelini on the bottom of a glass baking dish.
Place a large spoonful or two of the tomato-bean-basil mixture on one end of each fillet; roll up and secure with a toothpick.
Place the rolled up fish in the prepared baking dish.
Spoon any left over small bean mixture over the top of the fillets.
Drizzle with a small amount of white wine.
Sprinkle with the remaining basil and a few pinches of sea salt.
Bake in a 350 oven for about 15 minutes.
We served this with grilled zucchini.
Friday, June 24, 2005



The Vegetable Garden
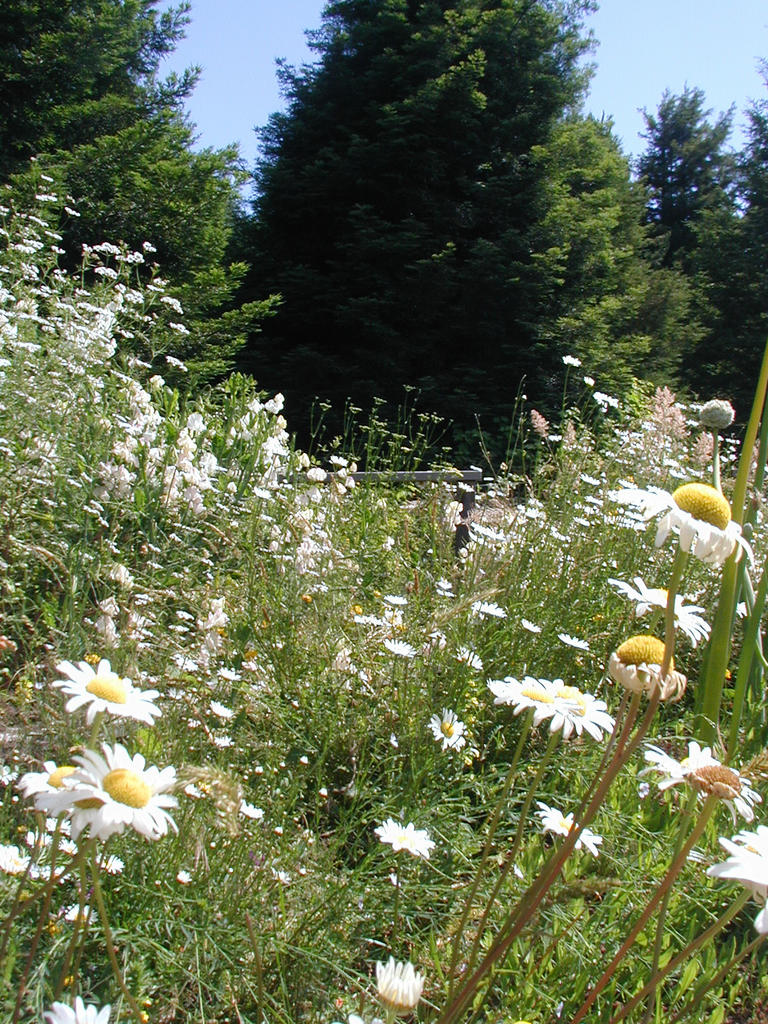
The weeds are waist high in my vegetable garden. I can barely make out the greens and purples of my newly planted basil, so lost are they among the wild cacophony of flowering invaders: Native white daisies in full bloom, their yellow centers reflecting the bright yellow blossoms of the invasive dandelions; blue-eyed flax; spikey evening primrose; nastily prolific but handsome copper and yellow coreopsis; native blackberry runners running amok; soft yellow buttercups; and the occasional volunteer onion, its papery white flowers atop a tall, smooth green stalk. Scattered here and there like punctuation marks, gleaming orange nasturtiums that escaped from their border bed grow in the understory that is my forest of weeds.
All these and more, beautiful in their own right, threaten my vision of the orderly rows of green beans, cucumbers, tomatoes and squashes that I have not yet been able to plant.
The late rains have drenched my garden's soil, the sloppy, muddy ground effectively keeping me from the task of weeding the usually easily contained maverick weed population which has grown so lush and abundant this year.
Today I stand on the deck overlooking my vegetable garden, leather gloves pulled on tight, hoe in hand, face raised to the gray and lowering sky, daring it to rain one more drop.
Sunday, May 29, 2005
Writing
Currently in the throes of a basic training food writers class, one thing has repeatedly been thwacked into my brain about what, among many things, makes a good writer. And that is RE-writing. That's right. You write, you think it's great, you find out there's room for improvement (sometimes a LOT of room), and you re-write. And re-write. And re-write.
Never have I been so mortified than when my writing instructor ever so gently told me that my article was, in effect, "navel gazing". Navel gazing is an introspective, self-absorbed style of writing that leaves readers bored out of their minds, saying to themselves, "Who gives a shit?"
This was a hard lesson to learn and an even harder excercise in discipline to get out of. (Eeeuuww, there's that preposition at the end of a sentence!) I have such a long way to go and so much more to learn.
Lest you're wondering, the purpose of this little blurb is two-fold: 1- sometimes I just need to share, and 2- if you read a post in this blog, then come back to it later (don't I wish!) and find it changed, NOW you know why.
Never have I been so mortified than when my writing instructor ever so gently told me that my article was, in effect, "navel gazing". Navel gazing is an introspective, self-absorbed style of writing that leaves readers bored out of their minds, saying to themselves, "Who gives a shit?"
This was a hard lesson to learn and an even harder excercise in discipline to get out of. (Eeeuuww, there's that preposition at the end of a sentence!) I have such a long way to go and so much more to learn.
Lest you're wondering, the purpose of this little blurb is two-fold: 1- sometimes I just need to share, and 2- if you read a post in this blog, then come back to it later (don't I wish!) and find it changed, NOW you know why.
Wednesday, May 25, 2005
Creme Fraiche
Creme fraiche is good. Creme fraiche is yummy. (Pronounce it "crehm fresh" and you'll impress the hell out of whomever, providing 1) -they've never heard of it and 2) -they're not French.)
Spread it on bread with jam, slather it over a hot scone, plop it onto a piece of fresh fruit pie, or a bowl of strawberries, or a baked potato, or into your mouth. Put a dollop on your hot green beans with a bit of lemon zest. Put some on your morning bowl of oatmeal. There isn't much that doesn't go well with creme fraiche although I'd stop short of putting it on my ice cream or sorbet. Not that it wouldn't be good, just a bit much.
If you're going to use it for sweets, place a split vanilla bean in with the ingredients. You can add a pinch of sugar after it has thickened.
Now comes the fun part. Creme fraiche is easy to make and that's what I'm going to tell you about today children. There's nothing like combining two ingredients that are beautiful unto themselves and from that union begetting the slightly tangy, silky, sweet fresh flavor of home made creme fraiche.
CREME FRAICHE
2 cups heavy cream (not ultra pasturized) - your search may take you to more than one market
2 tablespoons good buttermilk with at least 2% butterfat- for this recipe I used Knudson's reduced fat, cultured buttermilk, 2% butterfat.
Place the two ingredients (how simple is that?) together in a glass dish or measuring cup and stir well to combine.
Pour into a clean jar with a lid that fits tightly. Screw the lid on-- tightly.
Place in a warm spot like the back of your stove or on top of the fridge (if you live in the valley, any place is warm nine months out of the year) and leave it alone for 8-10 hours. That's the hardest part right there - leaving it alone.
After 8 hours, open the lid and give it a stir. If it's nicely thickened to the consistency of soft yogurt or thicker, it's done. If not, put the lid back on and let it sit another couple of hours.
THEN, put a spoonful in your mouth. Hold it there for a minute. Feel the creamy smooth texture, taste the tangy clean flavor. Then put the lid back on and stick it in the fridge. It'll thicken a bit more as it chills and will keep in the fridge for about 3 weeks. Some say it'll keep longer, but why risk it?
Now listen to your mother: if you just have to eat it by the spoonful, use a clean spoon and put some into a bowl. Eating from the jar will just put bacteria into that petrie dish and you don't want to experience the results.
Have fun!
Spread it on bread with jam, slather it over a hot scone, plop it onto a piece of fresh fruit pie, or a bowl of strawberries, or a baked potato, or into your mouth. Put a dollop on your hot green beans with a bit of lemon zest. Put some on your morning bowl of oatmeal. There isn't much that doesn't go well with creme fraiche although I'd stop short of putting it on my ice cream or sorbet. Not that it wouldn't be good, just a bit much.
If you're going to use it for sweets, place a split vanilla bean in with the ingredients. You can add a pinch of sugar after it has thickened.
Now comes the fun part. Creme fraiche is easy to make and that's what I'm going to tell you about today children. There's nothing like combining two ingredients that are beautiful unto themselves and from that union begetting the slightly tangy, silky, sweet fresh flavor of home made creme fraiche.
CREME FRAICHE
2 cups heavy cream (not ultra pasturized) - your search may take you to more than one market
2 tablespoons good buttermilk with at least 2% butterfat- for this recipe I used Knudson's reduced fat, cultured buttermilk, 2% butterfat.
Place the two ingredients (how simple is that?) together in a glass dish or measuring cup and stir well to combine.
Pour into a clean jar with a lid that fits tightly. Screw the lid on-- tightly.
Place in a warm spot like the back of your stove or on top of the fridge (if you live in the valley, any place is warm nine months out of the year) and leave it alone for 8-10 hours. That's the hardest part right there - leaving it alone.
After 8 hours, open the lid and give it a stir. If it's nicely thickened to the consistency of soft yogurt or thicker, it's done. If not, put the lid back on and let it sit another couple of hours.
THEN, put a spoonful in your mouth. Hold it there for a minute. Feel the creamy smooth texture, taste the tangy clean flavor. Then put the lid back on and stick it in the fridge. It'll thicken a bit more as it chills and will keep in the fridge for about 3 weeks. Some say it'll keep longer, but why risk it?
Now listen to your mother: if you just have to eat it by the spoonful, use a clean spoon and put some into a bowl. Eating from the jar will just put bacteria into that petrie dish and you don't want to experience the results.
Have fun!
Wednesday, May 18, 2005
Maldon Sea Salt

"Pure flaky crystals... the chef's natural choice" is what it says on my newly acquired box of Maldon Sea Salt.

Purchased at Williams Sonoma in New Orleans last week, I used it for the first time last night and I gotta say

that all the hype I've been reading about "the pyramid-shaped soft flaky crystals..." is undeniably spot-on.
Those flakes are ...well... flaky, crunchy, big, pure white and taste deliciously of the sea.
Tuesday, May 17, 2005
Simple Pork And Veggie Stir Fry
Simple Pork & Veggie Stir Fry
Christine's original recipe
Ingredients:
2 thick cut, boneless sirloin pork chops
1 large sweet onion
2 bell peppers, red and yellow
3 small zucchini
3 small yellow crook neck squash
1 tablespoon NapaStyle Cocoa Spice Rub ( although I'm sure any seasoned salt will do, this struck me as going particularly well with the salsa below)
A splash of white wine
1/4 - 1/3 cup Jardine's Prairie Peach Salsa, or a salsa of your liking, but the peaches really shine here
Maldon Sea Salt
Tellicherry pepper
Olive oil for the pan
Preparation:
Cut pork chops into bite size pieces.
Chop onions medium dice.
Chop the rest of the veggies into medium dice or bite size pieces of your choosing.
Sprinkle the spice rub over the pork and mix it with your hands til the meat is coated.
In a hot skillet, in a few tablespoons of olive oil, brown the meat all over in small batches, remove to a plate and cover loosely to keep warm.
Turn the heat to medium, add a bit more olive oil to the pan and saute the onions until they soften and become golden.
Add the squashes and allow to cook, stirring often, until just softened.
Add the peppers and cook until all the veggies are just slightly more than al dente but not mushy.
Return the pork, with any juices that have accumulated, to the pan with the veggies.
Add the salsa and, if you wish, a splash of white wine. Don't go overboard on the wine as at this point the veggies will release some of their own liquid and you don't want this dish to be watery.
Stir just until the meat is re-warmed then remove from heat.
Christine's original recipe
Ingredients:
2 thick cut, boneless sirloin pork chops
1 large sweet onion
2 bell peppers, red and yellow
3 small zucchini
3 small yellow crook neck squash
1 tablespoon NapaStyle Cocoa Spice Rub ( although I'm sure any seasoned salt will do, this struck me as going particularly well with the salsa below)
A splash of white wine
1/4 - 1/3 cup Jardine's Prairie Peach Salsa, or a salsa of your liking, but the peaches really shine here
Maldon Sea Salt
Tellicherry pepper
Olive oil for the pan
Preparation:
Cut pork chops into bite size pieces.
Chop onions medium dice.
Chop the rest of the veggies into medium dice or bite size pieces of your choosing.
Sprinkle the spice rub over the pork and mix it with your hands til the meat is coated.
In a hot skillet, in a few tablespoons of olive oil, brown the meat all over in small batches, remove to a plate and cover loosely to keep warm.
Turn the heat to medium, add a bit more olive oil to the pan and saute the onions until they soften and become golden.
Add the squashes and allow to cook, stirring often, until just softened.
Add the peppers and cook until all the veggies are just slightly more than al dente but not mushy.
Return the pork, with any juices that have accumulated, to the pan with the veggies.
Add the salsa and, if you wish, a splash of white wine. Don't go overboard on the wine as at this point the veggies will release some of their own liquid and you don't want this dish to be watery.
Stir just until the meat is re-warmed then remove from heat.
With glee, season to taste with your Maldon Sea Salt - fingers held high as you release the lovely white crystals into the pan. Add freshly ground Tellicherry pepper et voila! Dinner!
Friday, May 6, 2005
Recipes for Josh
I love it when one of my sons calls me for a recipe. Despite all the years of odd food items appearing on their dinner plates while I was "creating" in the kitchen, that phone call means to me that my creativity, or at the very least experimentation, got through. I am an appreciated cook by my now adult children. Could higher praise be given?
Roasted Beet & Walnut Salad with Blue Cheese and Christine's Vinaigrette
3-4 medium size red beets, scrubbed clean, tails trimmed & leaves trimmed to 1/2 inch
1/2 cup walnut pieces, toasted on a cookie sheet in a 350 oven for about 12 minutes. Allow to cool.
Mixed spring baby lettuce or washed and dried fresh spinach
2 oz. good, crumbly blue cheese
Wrap each beet in foil. Place them on a cookie sheet in a 350 oven and bake for about 1 hour. Check for doneness by pinching with your fingers. A nicely roasted beet will "give" like a ripe avocado. There should be beet juice at the bottom of the foil packet also.
When done, open foil packets and allow beets to cool. Peel with a small, sharp knife, cutting off the beet tops. Cut into small wedges or whatever shape you heart desires. Just be sure they are bite-sized for your guests.
When toasting walnuts, watch them carefully. Nuts will attain a golden color and smell "nutty" when they are done. Leave them in the oven too long and they'll burn very quickly.
To assemble:
Toss greens, beets and walnuts with vinaigrette. Top with crumbled blue cheese and toss again gently. For presentation, you don't want to turn the blue cheese beet red.
Christine's Vinaigrette
First, buy a jar of Bonne Maman jam or jelly. Use up the jelly, then thoroughly wash the jar and lid.
With a permanent black marker (a Sharpie works great) and a ruler in hand, place the jar on a flat surface and stand the ruler upright on the flat surface and against the jar.
Take your Sharpie and make a mark on the jar about 3/4 inch from the bottom. Make another mark at about 2 inches from the bottom, or at the bottom points of the arches.
Now you are ready to make vinaigrette.
Pour black raspberry vinegar, or your favorite vinegar, to the first line
Add one clove fresh garlic, finely diced
A pinch of sea salt and generous grindings of Tellicherry pepper
A teaspoon of sugar
A heaping tablespoon of Grey Poupon
Blend well and taste. Adjust to your liking and slowly whisk in
extra virgin olive oil to the second line until thick and creamy.
Alternatively, pour in the olive oil, place the lid on the jar and shake like crazy until blended and thick.
There you go! Easy huh?
PS - I've been using the same jar and lid for about 20 years and it's time to get a replacement. The jar is just fine. It's the lid that wears out. So just in case you find that you LIKE Bonne Maman jelly, buy a few jars and when you recycle, tuck the lids away in a drawer. You'll be glad you did.
Subscribe to:
Posts (Atom)